Monday, October 24, 2016

Photographing Solo or with a Group?

Me and my dog Elmer at Chiricahua National Monument

Man's Best Friend


One thing I struggle with regarding my photography excursions is how I often wish I had someone to talk to besides my dog Elmer. He is a fantastic listener, never interrupting my discourses, but it seems like he doesn't contribute much to our conversations. Perhaps he's shy or intimidated by my wealth of knowledge!

When I started on my photographic adventure in August of 2013, Elmer was there to share in the experiences. He patiently waited next to me while I shot photographs of a gully in northern Arizona for probably two hours. Okay, he wasn't real patient - since we were just starting out he didn't realize that I didn't like him wrapping his leash around the tripod legs. Eventually, however, after three years or so, he's gotten really good at staying away from the tripod.

The Yin*


Campsite at Pine Flat Campground, April 3, 2015
Oak Creek, Arizona
During that same three years I've found myself wishing for more human interaction in my photography trips. In 2015 I was able to get out close to every weekend and a lot of those were over-night trips. When I did set up camp somewhere I really found myself wanting someone to talk to during the times that I spent sitting at the campsite, especially if they could talk photography and even better if they could teach me about photography.

I have made new photography friends and especially enjoy learning from them. I fantasize about going on weekenders where I watch them get amazing photographs and see how they go about it. Can you imagine what would it have been like to tag along with Ansel Adams or Galen Rowell?

Instead, it has been me and Elmer for most of my photography outings. As you can see, he's exploring our campsite in the image above. And, on a side note, he's also the only one that sits in my studio room at home while I process the images. Well, one or more of my other three dogs might join in at times. Elmer, however, is always there beside me; he got his name from Elmer's Glue - he's white and he sticks with me.

The Yang*

I have tried going out with one or more photography friends on various trips, all of which were just day trips. I've invited photographers on overnight trips too. I've had one person accept an invitation in three years for a short visit to Canyon Lake. I had another outing for some night photography that a couple of friends accepted. That's 2 outings with 3 people in 3 years.

On the other hand, I've accepted invitations from others and gone out with them to shoot places or things they were interested in. I've even looked into local photography groups and tested the waters with one to shoot the Perseid Meteor shower.  I have had or tried some "group" outings. And, I have enjoyed some of the discussions I've had during those shared experiences.

Channeling my Inner Hermit


While I still go back and forth on this issue, I really think that I end up producing more when I'm alone. I have read online, for example in a DP Review forum discussion, how a number of other photogs gravitate to this conclusion as well.

While it's fun to talk about camera and other equipment, even when I've been out with others I find that we don't set up our tripods next to each other. There are no 3-legged bonding moments.

Personally, when I'm shooting, I like to concentrate on what I'm doing. Perhaps it's because I'm getting older and have a hard time multi-tasking, especially compared to when I stood Officer of the Deck watches in the Navy. I have the exposure and composition considerations going through my head when I'm looking through the view finder. I have a hard time dealing with distractions at those moments, especially if the shot is tricky at all like when shooting the moon or milky way.

When I've been with groups I've found that either someone else is right where I want to shoot from or they're not at all where I want to shoot from so I walk away. They're either talking when I want to concentrate or they're concentrating when I want to talk. They're shining bright flashlights around at night when I'm doing a long exposure. They want to go on a trip to shoot mid-day wildlife while I want to shoot early morning sunrise landscapes.

Me at Seal Rock, Oregon, 8:52 PM
It could be that there is someone that shoots exactly like I do and is willing to get out of the house when I do for as long as I do. But that would be like finding the perfect spouse!

I enjoyed myself last year when I was on the Oregon coast. I could stay on the beach in the dark and cold until I no longer wanted to shoot and when I left no one was complaining that it was too soon or too early to leave.

I can take a break to eat when and where I want or decide to only eat the Jolly Ranchers and jerky I normally have in my Explorer. I can decide to call it a night and settle in somewhere at any time or I can decide to drive around the next bend to see what is waiting.

I think it might be good to go on a trip with another photog if they drove themselves and if we tried to meet at some point during the middle of the day. But I like to shoot sunrises and sunsets and night shots. I'll shoot mid-day if there's nothing I can do better, such as when I'm travelling and I'll only be at a certain location during the day like when I drove along US 395 beside the eastern edge of the Sierra Nevada last September. I was in Lone Pine during mid-day only. I didn't even take my DSLR out of its case. That kind of sucks too, because I liked Lone Pine more than any of the other towns along Highway 395 for some reason.

I'll keep extending invitations for photography trips once in a while but with the response I've had, I've kind of quit doing much of that. Likewise I may accept an offer once in a while to go with someone else when they ask. But because I tend to prefer wandering off by myself anyway, I'm just not that excited about invites. I like sharing my photographs but I think that the process of capturing them is more of a private thing. Well, I will likely take my dog Elmer!


* In Yin and Yang, Yin refers to the dark or cloudy while Yang refers to the bright or sunny.

Sunday, October 23, 2016

Nikkor 200-500mm f/4E Image Quality, continued

Testing the Lens


Nikkor 200-500mm f/5.6E
I went outside to my back yard a couple of weekends ago, at mid-day, and shot some sample images from my 200-500mm lens at different apertures and focal lengths. I had two goals:


  1. Try to be more scientific about knowing my lens – which apertures provide the sharpest images at which focal lengths. 
  2. Try to mark the lens for focus at infinity at a known f-stop so I could photograph the upcoming Hunters Moon that night. (http://earthsky.org/astronomy-essentials/everything-you-need-to-know-hunters-moon).


I don’t have much that I can see or shoot a photograph of from my back yard that is very far away. I settled on a power transmission tower that is about 1,000 feet away. I’m not convinced that it is enough of a distance to make much of a determination from so I’ll have to re-do my tests with a better subject.

Considerations for Depth of Field


According to my DOF calculator, using 500mm at f/5.6, the far end of the focal range is 1,290 feet; I want to go to infinity for the distant sky photography. Even at f/8 the far end is only 1,450. I need something at about 3,300 feet to get the far end of the range out to infinity using f/5.6.

But, what I did shoot may tell me something about the lens performance at this shorter range… Okay, it really didn’t. When I pulled the images in to Lightroom I honestly couldn’t see much difference between any of the shots as far as sharpness is concerned. That means that either my eyes aren’t very good or all of the shots were equally crappy. I think it’s more of the latter.

I noticed that while I was zoomed out to 500mm that the tower was really jiggling in the viewfinder. I had my camera on my tripod sitting on my patio. I don’t get where the vibration was coming from. I took some of the shots at 1/500 second and some with 1/800. I didn’t notice what looked like motion blur in any of the images but they also didn’t look terribly sharp.

Adding weight to the rig


I tried some of the images after suspending a gallon of water from the tripod to see if that helped (a gallon of water weighs about 8 pounds). It didn’t make any improvement that I could detect.
Another thing I noticed is that there was atmospheric distortion. Without looking through the viewfinder I could see heat waves between my location and the tower. I could see that in some of the images too, where the arms of the tower were distorted.

The bottom line for my experiment is that none of my images looked terribly sharp. I hope to try again soon with a more distant subject in a colder location like Flagstaff, Arizona. I also want to try getting some sort of bean bag or something to place on the lens to try to dampen vibrations.

In the meantime, I've uploaded some of the images here. You can click on them to see the full size. These were exported from Lightroom with White Balance set to Daylight, Tone Curve set to Medium Contrast, Lightroom sharpening set to 50, Detail @ 50, and Masking @ 50. Lens corrections were enabled. Camera Calibration was using Camera Neutral v2. All other settings were zero, default, or off.

These images are at 480mm and 300mm, avoiding the limits at either end of the lens. They are at apertures of f/5.6, f/8, f/11, and f/16.

Focal Length at 480mm


Nikon D610 + Nikkor 200-500mm at 480mm, f/5.6, 1/800s, ISO 100

Nikon D610 + Nikkor 200-500mm at 480mm, f/8, 1/800s, ISO 100

Nikon D610 + Nikkor 200-500mm at 480mm, f/11, 1/800s, ISO 100

Nikon D610 + Nikkor 200-500mm at 480mm, f/16, 1/800s, ISO 100

Focal Length at 300mm


Nikon D610 + Nikkor 200-500mm at 300mm, f/5.6, 1/500s, ISO 100

Nikon D610 + Nikkor 200-500mm at 300mm, f/8, 1/500s, ISO 100

Nikon D610 + Nikkor 200-500mm at 300mm, f/11, 1/500s, ISO 100

Nikon D610 + Nikkor 200-500mm at 300mm, f/16, 1/500s, ISO 100


Thursday, October 13, 2016

AF-S NIKKOR 200-500mm f/5.6E ED VR - It's not you, it's me

Nikkor 200-500mm f/5.6E

The  NIKKOR 200-500mm f/5.6E


I received my Nikkor 200-500mm f/5.6E back on Monday,  05/09/2016. At the time I was dealing with some health issues and didn't get around to shooting much with it after it arrived.

I've read a number of accounts stating that this lens has production quality assurance issues, such as this article on Photography Life (https://photographylife.com/nikon-200-500mm-f5-6-vs-500mm-f4-at-block-creek-ranch). A lot of articles tell you to get out and test the IQ (Image Quality) and send it back if it isn't good. Again, and unfortunately, I didn't do that.

Now I'm questioning the lens. Or myself.

What I care about in the lens


I really want sharp pictures. As the common term goes, I want "tack sharp" pictures. I want to use this, or any lens, to see the utmost detail in what I'm shooting which ends up being reflected in the sharpness.

I don't really care about vignette issues because any of the post processing software I have takes care of that (Nikon Capture NX2, Adobe Elements or Lightroom, or manually in Adobe Photoshop). Same with distortions, or at least to the point that I don't notice it (but I'm not terribly critical when it comes to that since I think that distortions mainly show up with subjects with a lot of straight lines such as architectural photographs).

For me, shooting primarily landscapes, the bottom line is that I want to see details in trees when they're shot from afar. I want to see details in rocks, boulders, or mountains. If I shoot an animal I want to see my reflection in their eye. In that regard I'm similar to Todd Vorenkamp who wrote this article for B & H about testing a lens for sharpness (https://www.bhphotovideo.com/explora/photography/tips-and-solutions/how-test-your-lens).

Treating her right

My Nikon D610 and Manfrotto 055XPROB Tripod

I know that the lens isn't everything when it comes to capturing sharp images. For instance, Ken Rockwell has posted an article about issues affecting image sharpness that has a lot of things to think about (http://www.kenrockwell.com/tech/unsharp.htm). And here's an article by Thom Hogan that's still available (although I don't think he has a link to it on his current site): http://www.bythom.com/rightpixels.htm.

Basically there are a number of items that combined will factor in to whether you get a sharp image or not and I try to address them as best as I can. First, I almost always use a tripod. I don't care if a lens has vibration reduction or not, I don't trust my shaky hands. Second, I almost always use a wireless remote shutter release trigger. Third, I use a mirror lock up mode (which is one reason I wanted the better camera, in my case, the Nikon D610. The Nikon D3200 doesn't have mirror lock up).

But what happens when you do those things and you're still not convinced your getting great (sharp) images?

Is it soft?


Climbers on El Capitan
Nikon D610 + Nikkor 200-500mm f/5.6E lens
The photograph at left of the climbers on El Capitan was shot with the Nikkor 200-500mm lens at 480mm, f/11, 1/200s, ISO 100. It was shot at 2:20PM in pretty bright sunlight (there weren't any clouds there and this cliff face was being hit with the sun on 9/6/2016. There was some breeze but not much and especially not where I was sitting in the El Capitan meadow.

This image has a link to the full resolution image. Sharpening has been applied but I still think I should be able to see more detail. I'm just not sure.

I do know that if you believe in the reciprocal rule for shutter speeds, with a 500mm focal length the shutter speed should be at least as fast as 1/500 seconds. I have to be honest and admit I haven't actually thought of that while shooting and consequently I haven't adjusted the lens as necessary to get that faster shutter speed (either by increasing the ISO or using a larger f-stop such as f/8). Prior to taking the shot, I consciously thought of setting the f-stop to f/11 in order to have a larger depth of field which means more of the shot should be sharp. Of course, there's only one distance from the camera that is the sharpest; the depth of field is a range of sharpness deemed to be "acceptable." But, the range should include a good amount of sharpness at the target distance.

Depth of Field Calculations


I shot the image above from the El Capitan Meadow near a fallen log. I can see it on Google maps, which allows me to also measure the distance from the log to the face, which is roughly 1,800 feet. There are various claims as to the height of the face; I'll just arbitrarily use 3,000 feet. I also know that the climbers were roughly 1/2 of the way up the face which makes them about 1,500 feet above the level of the meadow. Using a bit of mathematics, that means that the distance from my camera to the climber is roughly 2,343 feet. I'll round it to 2,300 feet.

There are many online depth of field calculators, and I chose to use the one by Studio JPIC (http://www.studiojpic.com/calculators/depth-of-field-calculator). Choosing the Circle of Confusion of 0.029 for my Nikon D610, and using the values above, the DoF (Depth of Field) is calculated to be from 1,167 feet to 76,562 feet for a total of approximately 75,400 feet (I'm ignoring the decimal portion, it's not really significant at these distances). The climber should have been in focus. 

Changing the Aperture on the calculator to 8, the DoF is calculated to be from 1,348 feet to 7,807 feet, roughly 6,500 feet, which is quite a change but still, the climber should have been in focus. Just for fun, I changed the aperture to 5.6, resulting in a DoF calculated to be from 1,539 feet to 4,543 feet, roughly 3,000 feet. I could have easily just left it there.

According to Thom Hogan's review of the Nikkor 200-500mm f/5.6E (thankfully someone puts more effort into testing lenses than I do - I can just benefit from their work), the lens (his copy at least) gets slightly sharper at f/8 than f/5.6 but not much. In fact, he says that by f/11 the diffraction starts to be an issue and implies it should be avoided. I need to commit that to memory - that unless I'm trying to get a sunburst (which requires the small apertures such as f/22), I shouldn't use this lens above f/8. And for this distance the DoF would have been fine.

So if it's not the (calculated) depth of field issue, what's the problem?

Is it truly soft?


I can only look at my images - I don't have another copy of the lens to compare them to. I think I need to actually go out and do some testing. I'll have to try to do that. But just through writing this and thinking about things, I want to keep my aperture at f/8 or lower.

Reciprocal Rule


Bison at the North Rim of the Grand Canyon
Nikon D610 + Nikkor 200-500mm f/5.6E lens
And for wildlife, or any subject with movement such as trees swaying in the wind, I want to pay attention to the "reciprocal rule" which provides a guideline that for a lens at 500mm the shutter speed should at least be as fast as the reciprocal of that length, or 1/500 second. I don't think that would have made much difference with the rock face since it wasn't moving much but I can't be sure that the climber wouldn't have been sharper. He could have been swinging around.

In the bison photograph at right, I shot this at 500mm with f/11, 1/100 second, and ISO 100. If you open this image you'll see that the eyes are not terribly sharp. It's not bad but I think there's some motion blur. I think this should have been shot at f/8 and a shutter speed of at least 1/500s and if necessary the ISO should have been bumped up. It was an early morning shot, at 8:33 AM, but there was plenty of sunlight and no clouds in the sky. I don't know if I would have needed to increase the ISO or not. 

No decision


It looks like I've got some learning to do regarding this lens. Long lenses require different considerations; they reveal a lot more motion in the camera. I haven't figured out if the lens is an issue or my technique. Until I determine whether I can do everything under my control to get the best image quality and sharpness out of the lens I don't have a reason to send it back to Nikon. I'll keep working with the lens and describing my results. 

Friday, October 7, 2016

More support gear

Black Diamond Ergo Cork Trekking Poles

I want to be a hiker!


Before my trip to Yosemite National Park last month I bought a few items I thought I'd need for camping. If I could afford to stay in a motel all the time those things wouldn't be necessary. But, not only can I not afford to stay in motels all the time, I am hoping to get in to shape enough that I can hike to photographic locations. I'm tired of only shooting what I can see from within short walks from a road.

In fact, I want to get to the point that I can do an over-night hiking trip. I'd love to be able to hike out, pitch a tent, shoot some photographs that most people don't shoot, and make it back without serious health issues. That is what I'm working on now.

That said, my purchases prior to going to Yosemite were intended to start getting the gear required (or at least required as far as I know from watching YouTube!).

As I mentioned in my posts on August 24, 2016August 27, 2016, and September 21, 2016, I got some gear and clothing. I like all of my clothing purchases and am satisfied with my other gear. 

I'm heading to the Grand Canyon National Park - North Rim soon and decided to add some additional items.

More Stuff for Me

BPA Free 1 Gallon Jug

When I was at Yosemite National Park I had a hard time carrying water with me. It wasn't terribly hot but I often have a hard time with cramps when I'm camping and staying hydrated helps greatly. I have also found that by drinking more I don't get as hungry. Over the past year or so I've started drinking a lot of water which is why I got the water bottle to carry in my Explorer.

I carry a stainless cup in my Explorer and keep it filled using this water jug - and I use it because it has a screw top lid that is pretty secure. I get gallons of water from gas stations which have those snap on lids and then pour it in to this jug which doesn't have a lid that can pop off while driving over bumpy roads.

The problem is trying to carry my stainless cup with me on a trail, even a short one. The Columbia Silver Ridge Convertible pants have a cargo pocket on the right leg and I did carry the stainless cup in that pocket some but there were issues. It's heavy (24 ounces) which tugged on the pants significantly. I'm one of those guys that has a butt which is as shapely as a sheet of plywood, that is, without much to keep my pants up. The weight of my water cup kept me having to pull up my pants.

The cup also bangs around. It's not held tightly to my leg so each step as you walk the cup swings out then back to hit your leg. It didn't hurt but it was annoying. And, when I wanted to crouch or bend down and get on my knees, it was in the way then too. It just wasn't a great option.

Hydration Backpack


GkGk Hydration Backpack
I decided to get a Hydration Backpack and ordered the GkGk Hydration Backpack With Waterproof Cover from Amazon for $21.99.

I don't know for sure how this will work since if or when I start actually hiking I will need a full backpack which will have its own water bladder. And, when walking a trail to shoot photographs I hang other things on my shoulders so this may not be practical then either. 

I use a LowePro waist bag when I carry my gear, which has a shoulder strap. If I want to take my Nikkor 200-500mm lens I carry it in a separate Amazon backpack. I sometimes put a strap on my Manfrotto 055XPROB tripod and carry it with a strap that goes over my shoulders.

This was a pretty inexpensive way to try out a hydration backpack to see how I can work it in to work with my camera gear bags. I hope to try it out at the Grand Canyon and will let you know!

Snow Peak Titanium Mini Solo Cook Set


Snow Peak Titanium Mini Solo Cook Set
Before my last trip I had bought a MSR Stowaway Pot - 1600ml from REI. While it cooked okay, the handle is not very secure making it very difficult to pour out of. I decided to look for something else. After watching a number of YouTube videos about hiking cooking gear, I decided to try a Snow Peak titanium set from Amazon.

This set has much better handles. It is small, however. It probably will be okay if I use it while hiking by myself or if other people have their own pans. But I'm not sure how it will work to try to cook a meal for two. It's not advertised for that purpose but my wife and I will try it out while at the Grand Canyon.

It is too small to get a medium fuel canister inside of it. The small size might fit but I don't have a small one to try. I was able to get my Primus Yellowstone Classic Trail Stove inside. 

Sock Liners


Darn Tough Boot Socks
I also decided to try some sock liners. My wife and I have both purchased and really like Darn Tough Merino Wool Hiker boot socks. However, we both have a small issue with them bunching up as you walk. We haven't walked far, perhaps a couple of miles, but we both experienced it. 

In my case I think I bought socks that were too large. I plan to get another pair or two, and thanks to Amazon's return policy, I'm going to try a smaller size to see if they work better. 

But I've also read about using sock liners. I was hoping to have something that grips your feet and allows you to slide around in the boot sock, hopefully preventing the sock from bunching up. That's one of the things a sock liner is supposed to do. 

Fox River Liner Socks
I decided to get a couple pairs of Fox River Outdoor Wick Dry Alturas Ultra-Lightweight Liner Socks from Amazon for $5.99 each. I wear between a size 11-1/2 and 12 shoe so I ordered the XL size which is for size 12-14-1/2. I've received them and I'm concerned that I should have got the large (L) instead. These fit slightly loose and I'm worried about how they may either not solve my problem or may even compound it. 

I do like them other than perhaps the size issue. The seam above the toe is on the outside of the sock which means it won't dig in to your toes as much. It's also not right on the tip of your toes so it won't hurt you there either.

I will be trying these out at the Grand Canyon to some extent and I'll let you know how they work!

Photographing El Capitan in Yosemite National Park

Yosemite Valley from Tunnel View

Welcome to Yosemite!


There are a lot of photographic opportunities in Yosemite National Park. I'm sure that statement is not news to anyone. I visited the park for the first time in September, 2016 for about 3 days and got to see a lot of it. But in 3 days I don't think you can get great photographs of everything unless you're extremely lucky.

After reviewing my photographs, I feel that I really only captured some decent shots of El Capitan. Perhaps because it is the most accessible for someone in my condition (I didn't hike at all, and especially didn't climb up any of its routes!).

El Capitan can be photographed from Tunnel View, the Merced River, El Capitan Meadow, and up close from the El Capitan Trail. I'm sure there are locations at some of the cliff tops along the southern edge of the Yosemite Valley such as the Cathedral Rocks that offer great vantage points too, but I haven't found any photographs posted from such a location.

Let me interrupt - I know that my blogs are being read - I would really like to hear your thoughts or comments, good or bad. You should be able to leave comments below without having to log in. Please let me know what you think of what I have to say!


Location, Location, Location


Google Map of El Capitan and part of Yosemite Valley
If you've never been to Yosemite National Park, as I hadn't, here's some information about Yosemite Valley, focusing on El Capitan.

Yosemite Valley is located in Yosemite National Park. The valley is surrounded by the famous Half Dome, El Capitan, and Glacier Point formations. The Merced River runs through the valley. The valley is where the main park visitor center is located, along witih 4 campgrounds.

In the capture from Google Maps at right, which shows part of Yosemite Valley, the red marker is on El Capitan. El Capitan is at the west end of Yosemite Valley, on the north side. Across from El Capitan on the south side are the Cathedral Rocks. In the picture at the top of the page, the Cathedral Rocks are the closest 3 domes on the right side of the image. In front of them is Bridal Veil Falls (without much water during September).

The pointy part of El Capitan is called the "nose". As you can see, it points almost due south.


Best Time and Placeto Photograph El Capitan


Morning Time


El Capitan, shot from the
middle of Northside Drive
As you can see from the map, the right side of the El Capitan nose will get the morning light and the left side will get the evening light. In addition to that, the early morning shots will likely be easier due to fewer people out and about. When I visited in early September it seemed like the valley was pretty inactive until about 8:30AM or so. That gave me plenty of time to have a lot of the roads available to myself.

As you can see from the shot at left, I was able to shoot from the middle of Northside Drive (the west bound road that runs along part of the north side of the valley).

For this shot I actually got everything set up on the camera while on the side of the road. When there were no cars I went out to the middle of the road, listening for cars (which works as long as they're not a Prius!), leveled the camera and composed and took the shot.

This was taken at 8:01 AM with my Nikon D610, Nikkor 16-35mm f/4 lens, 1/320s, f/8, ISO 100. It would be much harder to do later in the day when this road is pretty well packed or has constant traffic.


During Mid-Day


El Capitan from El Capitan Meadow
Mid-day lighting at 3:03 PM
Mid-day shots aren't usually very memorable. They don't often have much wow factor. I shot some during the day including the one at left, which was taken at 3:03 PM. It's okay but the light doesn't have a great color and there were no clouds in the sky . 

The lack of clouds led me to not leave much sky in the composition. I liked the meadow but photogenically I'm not as excited by the yellow grass - I'd rather have seen it when it was green. This photograph probably works more as a vacation reminder than anything that someone would hang on a wall.

On the other hand, what I did find interesting during the day, was that there were climbers on El Capitan! I walked along the El Capitan Trail and heard them above me. 

It gave me a good excuse to pop on a telephoto lens. I shot the climbers using my Nikkor 70-200mm when I was close to El Capitan on the trail, and then when I was out in El Capitan Meadow I used my Nikkor 200-500mm and shot some more.

I didn't have the 200-500mm with me when I was on the trail so I didn't shoot that way. I wish I had because due to the increased distance of being out in the meadow, the size of the climbers is about the same between the photographs shot with either lens.


Climbers on El Capitan


The photograph above was taken using my Nikkor 200-500mm f/5.6E, 1/200s, f/11, ISO 100. I shot this from near the fallen tree out in the meadow at 1:52PM. A number of other people were there too, including climbers and photographers, one of which also had the Nikkor 200-500mm.


In the Evening


El Capitan over the Merced River
Morning shot, 7:49 AM
I only shot El Capitan in the evening from Tunnel View. I think it would work to shoot from along the Merced River west of El Capitan to get the golden sunlight hitting the west side of the nose. 

This shot on the left is a morning shot but you can see that the left side of El Capitan should get the sunset light and I think you'd have a nice photograph. 

Note that the Merced River was pretty low. If you are there in spring time these rocks would be covered. Also, the shot might be a bit better if you walked up the river a bit to get more of El Capitan out from behind the trees.

I was at Tunnel View during two evenings and enjoyed the sunsets from there. Here are a couple of different shots at different times.


Yosemite Valley from Tunnel View
4:41 PM

This photograph was taken at 4:41 PM. It's actually an HDR photograph with very subtle HDR processing - except that I don't like the white at the bottom of the sky. It was shot with the Nikkor 16-35mm f/4 at 22mm, f/10, ISO 100 (and multiple shutter speeds).

I did NOT zoom in solely on El Capitan from Tunnel View in any of my shots, although it could be done. But looking at this I think you'd agree it probably wouldn't be that great. I think the better shot is when more of the valley is included. However, different light may change that.

The shot below was taken at 6:56 PM using my Nikkor 70-200mm f/4 lens at 70mm, f/11, 1/100s, ISO 100. It points out an issue with shooting this side of El Capitan at sunset: the cliffs to the west of El Capitan cause shadows to fall across the face as the sun sets.


El Capitan at Sunset

Looking at these last two photographs, taken from near the same location (they were actually shot on different days), you can also see the difference in composition due to the focal lengths. The top is at 22mm, the bottom at 70mm. I chose to put Half Dome about in the center of the bottom image which meant that El Capitan is truncated severely.

UPDATE: And finally, I wanted to include this night shot from El Capitan Meadow - another shot of the climbers. I took this with my Nikkor 20mm f/1.8 at 20mm, f/1.8, 4s, ISO 320.

El Capitan with Lights and Stars


I hope this gives you some ideas about where to shoot El Capitan when you visit Yosemite National Park! 

Tuesday, October 4, 2016

Review of SanDisk iXPAND FLASH DRIVE 32G

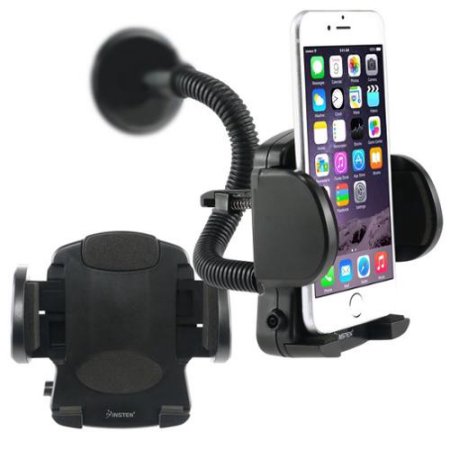
Smart Phone Windshield Mount

Windshield Mount for my iPhone


On my trip to Yosemite and other locations last month, I had got myself a windshield mount for my iPhone from Walmart like the one pictured at left. In a number of my drives over the last year or so (since I started using a cell phone), I've taken photos or even videos while driving. I've done this in a not-so-safe way by holding the phone while driving.

I'd wanted a better and safer way to do this so before heading to Yosemite I picked up this little device for maybe $10 or so. It works really good as long as you mount the phone in the center of the windshield (at least I had to do that in my Explorer). The windshield has too much curvature on the edge near the driver's door.

The only issue I had with using the phone on this device is that you have to reach to the phone to take a picture or start and stop the video capture. But, that takes less effort and is probably less dangerous than also holding the phone while taking a picture or video. I wish I had a voice activation (I wonder if Siri can take a picture?).


Too Many Photos and Videos fill up the iPhone


The other issue I had was that since it was easy to take a video, I found myself taking a lot of videos. I'm sure that none of them are really great but in the heat of the driving moment I found that I wanted to record the entire trip!


Joshua Tree National Park, California
I just have a small capacity iPhone 5 (12G?). I think about 5G is available for images and video. It doesn't take a lot of video to fill up the available disk space. I don't even have many apps installed, nor do I have any music or games, etc. Just a few camera related apps (depth of field calculator, snapseed, etc.) are installed.

I had moved all of the image files off of the iPhone prior to starting my trip. I drove from Phoenix, Arizona to Joshua Tree National Park, California where I spent my first night. The following day I drove to an overlook at Mono Lake near Lee Vining, California. I shot a lot of video of the drive along Highway 395 between Joshua Tree National Park and Mono Lake.

The following day I drove to my campsite at Crane Flat Campground in Yosemite National Park. Again, I shot video and photos along the drive. By the time I got to my campsite in the afternoon I'd basically filled my iPhone. I was already deleting files.


Enter SanDisk iXpand

I have a RavPower device that I can use to transfer files from SD cards to a USB drive. I have used this for my DSLR backup strategy. I thought I'd be able to use it for the iPhone too but it doesn't work. Even though it has a wireless WiFi hub, I don't have any software on the iPhone that will move files to the RavPower. And you can't plug the iPhone in to the RavPower because there is only a single USB connection to the RavPower and that is where the USB drive has to attach. It just won't work. Note: I should have tried to back up the iPhone before leaving home!


SanDisk iXpand
Before leaving on my trip, my wife and I had seen a commercial on television for a device you could plug in to the iPhone which would back up your images. At my campsite I was thinking I should have picked one of those up!

After returning home I decided to get something for that purpose and found out SanDisk has such a device. I ordered the 32G version from Amazon. (As I'm writing this I noticed that the price has gone up from what I paid - I think I paid $39 - my wife actually ordered it with one of her orders - and now it is selling for $41).

If you decide to use one of these you'll want to try it out before getting out of WiFi or internet access because you need to get the associated app from the app store (I assume there's an android version but I've only used the iOS version).

The app is pretty simple but, as with most software these days, a bit cryptic and lacking for instructions. I am not fond of having to poke around software to try to figure out how it works. You can, however, download a PDF user manual (http://downloads.sandisk.com/downloads/um/ixpand-usb3-um.pdf) although I didn't see it listed anywhere in the included brief notes on the packaging, nor in the app itself.


What I think of this device


Once you've installed the app, you plug the iXpand in to the iPhone, and open the app. It does work okay with my iPhone which has a Body Glove Shocksuit case - the device plugs in around the little cover for the Lightning connector.


File names get Changed


You can set the app up to automatically backup your images and videos. When it does the backup, the files are stored in a folder on the thumbdrive especially for backups. The files are copied over and their file names are changed to a cryptic file name such as "6addfec867c382ec-photo.jpeg". You can still see when the images were taken (on Windows 7) so you can still somewhat group them but the iPhone "IMG_XXXX.JPG" file name is gone so you won't be able to sort by file name.

This is irritating to me and I don't see the value. Online they have a lame excuse about iOS using some such name to preserve uniqueness. I have suspected that iOS does some crap behind the scenes before, but even if it does, I wish that SanDisk would use a lookup table or some other way to keep track of the files. I use other software to compare folder contents and it won't work when the file names are different.


Redundant Information in the New File name

Also, what is the purpose of the "-photo" portion of the file name? That is obvious by the extension. And if there are both video and image files in the same folder, they are differentiated by the extension (videos use a "-video" name section along with a ".mov" extension in the SanDisk backup folder).


Copy Function


The app also offers a separate Copy function which allows you to copy files under your control. You can create a new folder and Copy selected image and video files to the thumb drive. When you do this the file names are not mangled. You have the option to select individual files or you can easily select files for an entire day (the day the image or video was shot).

Once the Copy process is finished you are given the opportunity to delete the files from the iPhone.

This is probably how I'll end up using the app and not using the auto backup functionality. The difference is that you could potentially end up with duplicates on the thumb drive because the unique file names aren't used when backing up this way. However, if you do your Copy into a new folder for the selected items and then delete the copied images you shouldn't end up with duplicates anyway and the files will be more organized (at least they will for me).

Missing Auto-delete


I had read somewhere, perhaps on Amazon, that you could also set up the software to automatically delete from the iPhone once a file is copied. This option doesn't appear anywhere in the minimalist app. I think it should be an option. Some folks may only want to back things up but I'm using it to offload images and videos in order to free up space on the iPhone. You can select to do the delete when running the Copy function but not the Backup function.


Bottom Line


I admit to being unimpressed with any iPhone app. I don't like the lack of documentation. I don't like many of the iPhone user controls (I hate the spinner things for selecting a date, for example). I think a lot of software is designed for kids that don't read (either due to lack of ability or patience or desire for information). Okay, I'm part curmudgeon. Probably a large part. But as a software developer and user since about 1980, I expect more professional level documentation and thoughtfulness in design. It's why I'm not a big fan of Google either.

That being said, I also have not been a Western Digital fan for a good number of years. I've tried a number of their hard drives going back to the 1990s and have had a lot of issues with them. For the last 5 years or more I only use Seagate drives because they've never let me down. Western Digital bought SanDisk this year (2016). It makes me question how long I want to keep using SanDisk products. I've used Lexar and SanDisk SD cards - they both get good reviews for quality and dependability - but I may now switch over to Lexar only.

I don't know how much influence the Western Digital people had on the iPhone app and the decisions regarding file renaming, no link to the user manual (why wasn't it included on the thumb drive?), lack of auto delete (with verification prior to deleting). But even if they didn't have anything to do with it I am still not impressed with the software. There was another app on the Apple store that I may look in to regarding using the thumb drive.

The software isn't great but you can offload your images and it does work pretty fast (the interface to the computer is USB 3). For that reason I am satisfied with the purchase. I almost wish I'd gone ahead and got the larger size. I may need to get a second one of these or give this to my wife and get myself the 128G version.


Updates


I did want to mention another option which I may try - you can have your iPhone store image and video files directly on the thumb drive, avoiding the Copy or Backup function altogether. 


October 16, 2016

Angels Window
North Rim of the Grand Canyon National Park
I was looking for my iXpand - I hadn't seen it for a couple of days. My wife was doing laundry and there was something banging around in the dryer. I looked and the iXpand was there, nice and toasty. I had left it in a shirt pocket. It had now been through the wash and the dryer.

I had used it on my trip to the Grand Canyon the prior weekend. When I plugged it in to my PC, everything was fine! Here's a shot from the Grand Canyon North Rim that has been washed and dried! I don't think the image looks that washed out.