Showing posts with label review. Show all posts

Wednesday, February 22, 2017

The Adobe Photoshop CC Book by Scott Kelby - Review

Short Review: The Adobe Photoshop CC Book


I have watched a lot of Scott Kelby's YouTube videos, including his weekly show called "The Grid". I like his show and his guests. I have picked up a number of good tips from him such as the one that led me to purchase the Tether Tools Case Air. He's shown me a number of good ideas for using Adobe Lightroom and Photoshop. When he came out with this new Photoshop CC book I decided to try it. I was hoping to get even more cool tips.

I got this in January, 2017, from Amazon. It's a decent sized book, clocking in at 360 pages. Almost every page is split into two - images and screenshots on the inside of the page and text on the outside of the page. The text illustrates a concept and the images or screenshots show the steps or results of the steps.

Pros (or is it "prose"?)


The book covers probably everything you'd need to know to edit photographs using Adobe Photoshop. He concentrates on using Adobe Camera Raw (ACR) for the basic edits, and, in my opinion, rightfully so. I don't remember if he mentions it, but if you shoot RAW, you'll probably be working with greater bit depth which generally works better with the edits. The more you can do in ACR the better.

I liked his writing style and the book format. He doesn't waste a lot of space or writing. He provides a short explanation of a problem and how it can be addressed then explains the steps to accomplish the task. Not much nonsense. It makes for a book that can be a useful reference - if you need a refresher on how to do something you can turn to that section and you'll quickly get the instructions for completing the edit.

Most of the individual edits take only 1 or 2 pages including the images. There are some that span a few more pages.

He provides some quick tips at the end of each chapter that are usually a few sentences at most. These can include keyboard shortcuts.

The book is printed on nice, glossy paper. I think I only saw one or two spelling errors.

Cons


I only have one personal minor complaint about the book, and one comment.

My complaint may not apply to everyone and I also don't know that much can be done about it without making the book more expensive. I had problems seeing some of the details in some of the images with my old eyes. I don't think I would have had the same problem some years ago. If the images were larger, however, it could double the size of the book and that would make it even more expensive. The only suggestion I can offer is that maybe it'd be cool if all of the images were available online (he does have a companion website for the book but I haven't visited it - perhaps the images are already there).

My comment is also self-centered... I did read the book cover to cover, although I skimmed over the sections pertaining to portraits since I don't shoot them. I found that I already knew most of the material. I picked up a few things that were new but not many. I've been using Photoshop for a couple of years now and have watched a lot of videos plus I have the Martin Evening Photoshop CC book (the 2013 edition) so I've learned a lot about processing images. I was just hoping that I'd pick up even more "insider" tips.

The Bottom Line


I like this book a lot. There's a lot in it, Scott's writing style is easy to understand and follow. It doesn't cover every filter or every menu item, just the ones you're likely to use when editing a photograph. Note that it is listed as NOT targeting beginners so there are some steps he doesn't cover such as a lot of the preferences, how to use Adobe Bridge, etc.

I recommend this book to anyone who wants a thorough guide to Adobe Photoshop CC for editing photographs.


Monday, January 2, 2017

Tether Tools Case Air - Review - UPDATED 3 Times

First Real-World Use


My Nikon D610 + Tether Tools Case Air
I finally got out yesterday to take some photographs. I was excited to try the Tether Tools Case Air Wireless Tethering System for the purpose that I bought it - some wide angle shots taken from the ground.

I left Phoenix, Arizona at about 5:00 AM and headed to the Saguaro National Park (west - there are 2 territories for this park) near Tucson, Arizona. It's roughly an hour and a half drive from my home with no stops.

I had only been to the visitor center at the park before, never out on any of the dirt roads. I arrived at the park around 7:30 AM when the sun was just starting to rise and headed northeast up the Hohokam Road shortly after turning on to N. Kinney Road.

It had rained a bit on the drive to the park and I wasn't sure how the skies were going to be. I was hoping for broken cloud cover since the rain had come and gone during the dark drive from Phoenix and it looked like I was going to get what I hoped for. Happy New Year!

I drove to the Hugh Norris Trail head, parked, got out and looked around but didn't see any good saguaro cactus near the parking area and I didn't want to walk far in the desert because, well, you're supposed to stay on the trails.

The Sus Picnic Area


My Manfrotto 055XPROB
(legs not splayed out)
I headed back to the Sus Picnic Area and parked there. There are some nice saguaro cactus there, but not where I wanted them - they were not not lined up well for the rising sun. I walked maybe 100 feet into the desert south of the road to try to get a shot looking south-east where the sun should come up and hopefully light up the clouds.

I fiddled with my Manfrotto 055XPROB tripod to get it into the configuration that allows you to get it close to the ground. You have to switch the center column so that it's sticking out, as shown at right. I've been somewhat looking for a different tripod that doesn't have this fiddly aspect. Manfrotto used to offer a short center column so that you didn't have to fuss with it but they don't any longer and I haven't found one used.

I thought this would be a cool feature when I first got the tripod but after having it since January, 2014, and not extending the center column but maybe 3 or 4 times, I find it's a pain.More often than not I want to shoot close to the ground and I really dislike fiddling with the center column on this tripod. I'm really considering getting a PlatyPod Pro Max.

Trying the Case Air

I attached the Case Air remote to the camera and fired it up as directed (camera power on, Case Air power on, Case Remote app on). Note that I was using my iPhone 5 with the latest iOS update. Everything started up okay and the Case Remote app indicated that it was connected to the Nikon D610. Cool!

But that was about as far as I got. (Here's a link to the documentation if you're interested: https://www.tethertools.com/wordpress/wp-content/uploads/2016/10/CAWTS03_ios.pdf)

Case Remote App
On the app you have to click an icon to see the remote
Live View (#8 - the "eye" icon near the lower right of the app). This is supposed to let you see what the camera is seeing by displaying a Live View in the large upper area in the app (#4, where the "CASE Remote" text is).

When the Live View is displayed you can either manually adjust focus by tapping on the left and right arrows (#9 and #11 on either side of the big white shutter release icon), or you can tap on the image and auto focus (if you have auto focus enabled).

In my case, the Live View would only fill up about the upper half of the display area and the bottom half was flashing gray. Within a second or two the app would close.

I tried it probably a half of a dozen times or so with the same results. Since the sunrise was happening, I turned off the Case Air and iPhone, switched to the old school method and bent over as well as I could to use the camera's Live View, hit my back focus to focus where I wanted, and got off a few shots.

I've contacted Tether Tools about this to see what their response is but haven't heard back yet (it is the New Years weekend after all). I'll either update this blog or post another blog with the feedback. I did find others posting similar issues online.
_____________________________

Update, 1/4/2017

I heard back from Catherine at Tether Tools within one day (1/3/2017). She has forwarded my issue on to their development team. I'm not sure if the dev team is in Phoenix (the Tether Tools headquarters is), but if they are, I offered to stop by to show them my problem.

Update, 1/19/2017

TetherTools posted an update to their software and firmware about 1/13/2017. I successfully installed the update on 3 devices - my PC, iPhone, and my Samsung Tab 4 (that's 3 out of the 4 different operating systems they support). Unfortunately the Case Air itself wouldn't update. I contacted Catherine about it...

I heard back from Catherine at Tether Tools today (1/19/2017). She emailed me an RMA so that I can return the unit which I'll do tomorrow at their Phoenix headquarters. I'm taking my camera with me to verify that it works. I appreciate their strong desire to make sure the unit works!

Update, 1/21/2017

I went to the Tether Tools offices yesterday and met Catherine. She pleasantly exchanged my unit for a new one. She later sent me an email letting me know that she tested my original unit but didn't have any issues with it - she couldn't replicate my failure to update the firmware. I don't have any idea why I couldn't do it. She said the problem is typically due to a weak WiFi signal and wondered if my iPhone or other devices had issues connecting. I told her I hadn't noticed issues with connecting before.

After I got the new Case Air charged up today I tried it out. As soon as I fired up my iPhone 5 and connected to the Case Air I got the notice that I needed to update its firmware so I tried it. It worked fine, first time, no issues. One problem solved.

Next I tried to take a picture. This time it worked better. When you take a picture I have it set to send me the JPEG. That auto upload was spotty on the original unit but this time the thumbnails came up just fine. But after 2 or 3 shots the live view preview on the app started flashing gray and the app closed. It did this everytime I tried it.

I decided to try my Samsung Galaxy Tab 4. After getting it up and running and connected, it worked fine. I could take shots and receive the thumbnails. It looks like this will be my solution which is okay except that now I have to carry the tablet with me. The iPhone fits in my pants pocket but the tablet, even though it's fairly small, will be harder to pack somewhere.

The bottom line, though, is that I should be able to use the Case Air now. Tether Tools really stands behind their product. I can't remember ever dealing with a company so willing and desirous to make sure their customer was satisfied. I can tell that Catherine and the others I've talked to there take a lot of personal pride in their products.

I also want to say that I searched online for other reports of problems with the device and didn't find anything. I did find other reports of other users contacting Tether Tools and having nothing but the best to say about them. And, again, I'm not affiliated with them in any way, I am just impressed and pleased with them.

_____________________________

I had seen some issues at home but I had chalked them up as being due to having my home WiFi interfering with the Case Air WiFi. At the park, however, there were no other WiFi networks detected by my phone. In fact, there wasn't even any phone service detected. I tried moving the remote around and my phone around to see if that made a difference but it didn't so I suspect that the WiFi connection was okay.

If the WiFi connection is okay then that leaves either my phone can't handle the data or the data isn't being sent properly. I don't know which is more likely. What I do know is that the device didn't do what I paid for it to do. At this point I'm not impressed and I'm waiting for help from Tether Tools.

Oh, here's one of my old school, non-Case Air shots:

Sunrise at Saguaro National Park


Sunday, October 23, 2016

Nikkor 200-500mm f/4E Image Quality, continued

Testing the Lens


Nikkor 200-500mm f/5.6E
I went outside to my back yard a couple of weekends ago, at mid-day, and shot some sample images from my 200-500mm lens at different apertures and focal lengths. I had two goals:


  1. Try to be more scientific about knowing my lens – which apertures provide the sharpest images at which focal lengths. 
  2. Try to mark the lens for focus at infinity at a known f-stop so I could photograph the upcoming Hunters Moon that night. (http://earthsky.org/astronomy-essentials/everything-you-need-to-know-hunters-moon).


I don’t have much that I can see or shoot a photograph of from my back yard that is very far away. I settled on a power transmission tower that is about 1,000 feet away. I’m not convinced that it is enough of a distance to make much of a determination from so I’ll have to re-do my tests with a better subject.

Considerations for Depth of Field


According to my DOF calculator, using 500mm at f/5.6, the far end of the focal range is 1,290 feet; I want to go to infinity for the distant sky photography. Even at f/8 the far end is only 1,450. I need something at about 3,300 feet to get the far end of the range out to infinity using f/5.6.

But, what I did shoot may tell me something about the lens performance at this shorter range… Okay, it really didn’t. When I pulled the images in to Lightroom I honestly couldn’t see much difference between any of the shots as far as sharpness is concerned. That means that either my eyes aren’t very good or all of the shots were equally crappy. I think it’s more of the latter.

I noticed that while I was zoomed out to 500mm that the tower was really jiggling in the viewfinder. I had my camera on my tripod sitting on my patio. I don’t get where the vibration was coming from. I took some of the shots at 1/500 second and some with 1/800. I didn’t notice what looked like motion blur in any of the images but they also didn’t look terribly sharp.

Adding weight to the rig


I tried some of the images after suspending a gallon of water from the tripod to see if that helped (a gallon of water weighs about 8 pounds). It didn’t make any improvement that I could detect.
Another thing I noticed is that there was atmospheric distortion. Without looking through the viewfinder I could see heat waves between my location and the tower. I could see that in some of the images too, where the arms of the tower were distorted.

The bottom line for my experiment is that none of my images looked terribly sharp. I hope to try again soon with a more distant subject in a colder location like Flagstaff, Arizona. I also want to try getting some sort of bean bag or something to place on the lens to try to dampen vibrations.

In the meantime, I've uploaded some of the images here. You can click on them to see the full size. These were exported from Lightroom with White Balance set to Daylight, Tone Curve set to Medium Contrast, Lightroom sharpening set to 50, Detail @ 50, and Masking @ 50. Lens corrections were enabled. Camera Calibration was using Camera Neutral v2. All other settings were zero, default, or off.

These images are at 480mm and 300mm, avoiding the limits at either end of the lens. They are at apertures of f/5.6, f/8, f/11, and f/16.

Focal Length at 480mm


Nikon D610 + Nikkor 200-500mm at 480mm, f/5.6, 1/800s, ISO 100

Nikon D610 + Nikkor 200-500mm at 480mm, f/8, 1/800s, ISO 100

Nikon D610 + Nikkor 200-500mm at 480mm, f/11, 1/800s, ISO 100

Nikon D610 + Nikkor 200-500mm at 480mm, f/16, 1/800s, ISO 100

Focal Length at 300mm


Nikon D610 + Nikkor 200-500mm at 300mm, f/5.6, 1/500s, ISO 100

Nikon D610 + Nikkor 200-500mm at 300mm, f/8, 1/500s, ISO 100

Nikon D610 + Nikkor 200-500mm at 300mm, f/11, 1/500s, ISO 100

Nikon D610 + Nikkor 200-500mm at 300mm, f/16, 1/500s, ISO 100


Tuesday, October 4, 2016

Review of SanDisk iXPAND FLASH DRIVE 32G

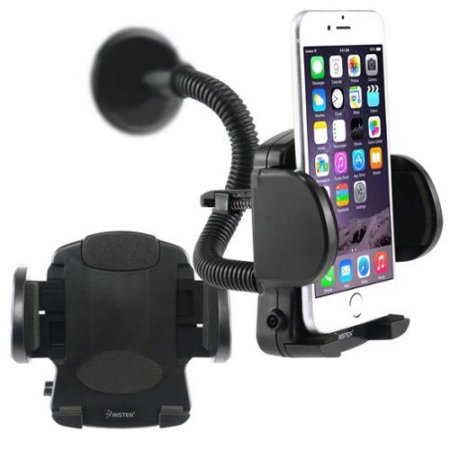
Smart Phone Windshield Mount

Windshield Mount for my iPhone


On my trip to Yosemite and other locations last month, I had got myself a windshield mount for my iPhone from Walmart like the one pictured at left. In a number of my drives over the last year or so (since I started using a cell phone), I've taken photos or even videos while driving. I've done this in a not-so-safe way by holding the phone while driving.

I'd wanted a better and safer way to do this so before heading to Yosemite I picked up this little device for maybe $10 or so. It works really good as long as you mount the phone in the center of the windshield (at least I had to do that in my Explorer). The windshield has too much curvature on the edge near the driver's door.

The only issue I had with using the phone on this device is that you have to reach to the phone to take a picture or start and stop the video capture. But, that takes less effort and is probably less dangerous than also holding the phone while taking a picture or video. I wish I had a voice activation (I wonder if Siri can take a picture?).


Too Many Photos and Videos fill up the iPhone


The other issue I had was that since it was easy to take a video, I found myself taking a lot of videos. I'm sure that none of them are really great but in the heat of the driving moment I found that I wanted to record the entire trip!


Joshua Tree National Park, California
I just have a small capacity iPhone 5 (12G?). I think about 5G is available for images and video. It doesn't take a lot of video to fill up the available disk space. I don't even have many apps installed, nor do I have any music or games, etc. Just a few camera related apps (depth of field calculator, snapseed, etc.) are installed.

I had moved all of the image files off of the iPhone prior to starting my trip. I drove from Phoenix, Arizona to Joshua Tree National Park, California where I spent my first night. The following day I drove to an overlook at Mono Lake near Lee Vining, California. I shot a lot of video of the drive along Highway 395 between Joshua Tree National Park and Mono Lake.

The following day I drove to my campsite at Crane Flat Campground in Yosemite National Park. Again, I shot video and photos along the drive. By the time I got to my campsite in the afternoon I'd basically filled my iPhone. I was already deleting files.


Enter SanDisk iXpand

I have a RavPower device that I can use to transfer files from SD cards to a USB drive. I have used this for my DSLR backup strategy. I thought I'd be able to use it for the iPhone too but it doesn't work. Even though it has a wireless WiFi hub, I don't have any software on the iPhone that will move files to the RavPower. And you can't plug the iPhone in to the RavPower because there is only a single USB connection to the RavPower and that is where the USB drive has to attach. It just won't work. Note: I should have tried to back up the iPhone before leaving home!


SanDisk iXpand
Before leaving on my trip, my wife and I had seen a commercial on television for a device you could plug in to the iPhone which would back up your images. At my campsite I was thinking I should have picked one of those up!

After returning home I decided to get something for that purpose and found out SanDisk has such a device. I ordered the 32G version from Amazon. (As I'm writing this I noticed that the price has gone up from what I paid - I think I paid $39 - my wife actually ordered it with one of her orders - and now it is selling for $41).

If you decide to use one of these you'll want to try it out before getting out of WiFi or internet access because you need to get the associated app from the app store (I assume there's an android version but I've only used the iOS version).

The app is pretty simple but, as with most software these days, a bit cryptic and lacking for instructions. I am not fond of having to poke around software to try to figure out how it works. You can, however, download a PDF user manual (http://downloads.sandisk.com/downloads/um/ixpand-usb3-um.pdf) although I didn't see it listed anywhere in the included brief notes on the packaging, nor in the app itself.


What I think of this device


Once you've installed the app, you plug the iXpand in to the iPhone, and open the app. It does work okay with my iPhone which has a Body Glove Shocksuit case - the device plugs in around the little cover for the Lightning connector.


File names get Changed


You can set the app up to automatically backup your images and videos. When it does the backup, the files are stored in a folder on the thumbdrive especially for backups. The files are copied over and their file names are changed to a cryptic file name such as "6addfec867c382ec-photo.jpeg". You can still see when the images were taken (on Windows 7) so you can still somewhat group them but the iPhone "IMG_XXXX.JPG" file name is gone so you won't be able to sort by file name.

This is irritating to me and I don't see the value. Online they have a lame excuse about iOS using some such name to preserve uniqueness. I have suspected that iOS does some crap behind the scenes before, but even if it does, I wish that SanDisk would use a lookup table or some other way to keep track of the files. I use other software to compare folder contents and it won't work when the file names are different.


Redundant Information in the New File name

Also, what is the purpose of the "-photo" portion of the file name? That is obvious by the extension. And if there are both video and image files in the same folder, they are differentiated by the extension (videos use a "-video" name section along with a ".mov" extension in the SanDisk backup folder).


Copy Function


The app also offers a separate Copy function which allows you to copy files under your control. You can create a new folder and Copy selected image and video files to the thumb drive. When you do this the file names are not mangled. You have the option to select individual files or you can easily select files for an entire day (the day the image or video was shot).

Once the Copy process is finished you are given the opportunity to delete the files from the iPhone.

This is probably how I'll end up using the app and not using the auto backup functionality. The difference is that you could potentially end up with duplicates on the thumb drive because the unique file names aren't used when backing up this way. However, if you do your Copy into a new folder for the selected items and then delete the copied images you shouldn't end up with duplicates anyway and the files will be more organized (at least they will for me).

Missing Auto-delete


I had read somewhere, perhaps on Amazon, that you could also set up the software to automatically delete from the iPhone once a file is copied. This option doesn't appear anywhere in the minimalist app. I think it should be an option. Some folks may only want to back things up but I'm using it to offload images and videos in order to free up space on the iPhone. You can select to do the delete when running the Copy function but not the Backup function.


Bottom Line


I admit to being unimpressed with any iPhone app. I don't like the lack of documentation. I don't like many of the iPhone user controls (I hate the spinner things for selecting a date, for example). I think a lot of software is designed for kids that don't read (either due to lack of ability or patience or desire for information). Okay, I'm part curmudgeon. Probably a large part. But as a software developer and user since about 1980, I expect more professional level documentation and thoughtfulness in design. It's why I'm not a big fan of Google either.

That being said, I also have not been a Western Digital fan for a good number of years. I've tried a number of their hard drives going back to the 1990s and have had a lot of issues with them. For the last 5 years or more I only use Seagate drives because they've never let me down. Western Digital bought SanDisk this year (2016). It makes me question how long I want to keep using SanDisk products. I've used Lexar and SanDisk SD cards - they both get good reviews for quality and dependability - but I may now switch over to Lexar only.

I don't know how much influence the Western Digital people had on the iPhone app and the decisions regarding file renaming, no link to the user manual (why wasn't it included on the thumb drive?), lack of auto delete (with verification prior to deleting). But even if they didn't have anything to do with it I am still not impressed with the software. There was another app on the Apple store that I may look in to regarding using the thumb drive.

The software isn't great but you can offload your images and it does work pretty fast (the interface to the computer is USB 3). For that reason I am satisfied with the purchase. I almost wish I'd gone ahead and got the larger size. I may need to get a second one of these or give this to my wife and get myself the 128G version.


Updates


I did want to mention another option which I may try - you can have your iPhone store image and video files directly on the thumb drive, avoiding the Copy or Backup function altogether. 


October 16, 2016

Angels Window
North Rim of the Grand Canyon National Park
I was looking for my iXpand - I hadn't seen it for a couple of days. My wife was doing laundry and there was something banging around in the dryer. I looked and the iXpand was there, nice and toasty. I had left it in a shirt pocket. It had now been through the wash and the dryer.

I had used it on my trip to the Grand Canyon the prior weekend. When I plugged it in to my PC, everything was fine! Here's a shot from the Grand Canyon North Rim that has been washed and dried! I don't think the image looks that washed out.

Saturday, August 13, 2016

First photos with my new AF-S NIKKOR 20mm f/1.8G ED

I got my new AF-S NIKKOR 20mm f/1.8G ED lens yesterday in time to try to shoot the Perseid meteor shower with it. I went out last night to a spot east of Apache Junction, Arizona, with the Arizona Night Photography group from meetup.com. There were quite a few people there; on the website 77 people said they'd be there.


Arizona Night Photography group
Perseid Meteor Shower 2016
The spot had pretty good levels of light pollution even that close to Phoenix. Unfortunately the moon didn't set until about 1AM. Not that it mattered, we didn't really see much of a concentration of meteors. I was there from about 6:30 PM to about 2:30 AM and probably only saw about 20 meteors or shooting stars. A couple were pretty bright but for the most part it was the same as my previous meteor shower outings - pretty underwhelming. I was bummed because this was being touted as the best event of 2016.

This outing worked like my others (I've tried to shoot Perseid and Geminid showers in the past). I'd see a meteor to my left so I'd point the camera that direction and take a number of shots. While doing that I'd see a meteor to my right so I'd recompose. A gal I met last night likened shooting meteors to shooting whales. You never really know where they're going to show until they're already gone. 

If there was truly a concentrated emanation point it might be different. But I haven't experienced that myself.

I still tried to get some shots with my new lens, even if they weren't including any meteors. I really wanted to see how it worked.

The bottom line is that I think the lens works great, at least compared to my AF-S NIKKOR 16-35mm f/4G ED VR. But I still had the same problems using it.


Moon Glow
20mm - f/2.0 - 2.0 sec - ISO 400
I shot 70 images but only got a few that were in focus. I really have a hard time focusing in the dark. The best subject was the moon but that was only good for the distant subjects such as stars. I was able to do that okay and I think the focus is pretty good. I like that I could use a lot shorter exposure time due to the faster (larger diameter) aperture. 

The image at right was shot with my Nikon D610 and the Nikkor 20mm at f/2.0 and ISO 400. I did crop it because the rest of the foreground at the bottom was out of focus.

The larger aperture diameter also reduces depth of field and it really came in to play. I was hoping that the larger aperture would allow me to focus easier since I thought I'd be able to view the subject better, either through the view finder or in live view. It didn't seem to make much improvement over the 16-35mm for me, however. I still struggled to focus.

I tried auto focus too but it was worse than manual focus. 


Focal Plane Example
20mm - f/1.8 - 8.0 sec - ISO 500
I shot this capture of a cactus but you can clearly see that the focus plane runs somewhere through the middle of the cactus. Some of the needles in the upper "crotch"  of the cactus are in focus as are some of the "blooms" on the ground. This image doesn't have any post processing done to it so you can also see the other artifacts.

So even though I shot a few pics, I don't have much to show for it due to my focus problems. I just couldn't focus on close objects. (The problem was not due to auto focus changing the focus when I shot the photograph - I had the auto focus turned off OR I used back button focus - focus doesn't change unless I want it to.)

If I hadn't been with the group of people trying to shoot night photographs I would have lit up the subjects with a flashlight while focusing.

Beyond that problem, which is with my technique or abilities and not that of the lens (since a few images were in focus), I had heard that the coma was really good in this lens. I know I've had issues with coma in my 16-35mm but this lens is a lot better behaved, probably due to the aspherical elements is my guess. And because this is a prime instead of a zoom.

Here's a pic with a bit of exposure adjustment but you can see the coma in a number of places in the corners. It's not bad. I haven't done it myself but I recently watched a YouTube of a photog who edits the stars that have bad coma, I think it was in Photoshop, and he'd just apply a round mask to the offending stars and get rid of the coma shapes.


Coma Example
20mm - f/1.8 - 8.0 sec - ISO 1000

I'm pleased with the lens so far and can't wait to put it through some more paces.


As for the outing, when I left the appointed location I travelled over to the Superstition Mountains to see if it was any better. It was sort of on the way home and allowed me to wait until a bit later. I got there around 3 AM. I got out of my Explorer, waited maybe 15 minutes but didn't see another meteor so headed home. 

I haven't been out much this year due to my health issues and this little shoot was very pleasant. The air temperature cooled after about 11 PM, maybe to 85 degrees F or so. Just sitting out under the sky, seeing part of the Milky Way with my own eyes, was simply wonderful. I got to meet a couple of gals who are knowledgeable about photography (both shooting full frame Sony A7 and A7R) and was able to talk to them for hours about camera gear and post processing. I don't care if I didn't get any good meteor images - I got a lot of pleasure!


Sunday, July 31, 2016

Initial Review of Wacom Intuos Photo - Small

My wife got me this new gadget for my birthday. I have been wanting to try one, especially since seeing videos with Elia Locardi and how he claims to get his post processing done faster than with a mouse.

It does make sense to me, using a tablet rather than a mouse for drawing (including using brushes in Photoshop or Lightroom). I must have "hinted" as much since one showed up for my birthday this year!

My wife wasn't sure if I'd like it, or which one to get, and ended up getting me the Intuos Photo - Small, with the idea that I could keep it or exchange it if desired. I had no idea either which one to get. I know Elia is probably using their most expensive version since he's a Wacom ambassador.

I've had it about a week now, and have probably used it for 20 hours or so including a good 6 hour stretch working on a single image just to try different edits with it.. Here's what I think of it so far...


Small is the right size

I've been reading a lot of reviews and tips regarding the tablet, as well as watching YouTubes (phlearn has a couple of nice intro YouTubes). One thing I saw over and over was other people saying the small was the best size. I was surprised, as an American, because doesn't bigger mean better? Well, in this case, I don't think so. For me, and the other photography post processors that wrote opinions, small is better for a couple of big reasons.

First is the desk space. I don't have a huge desk top to put a big tablet on, especially if you orient it in front of the keyboard like a lot of the pictures you see. I have mine to the right of my keyboard (I'm right handed), and have enough space for it, my two monitors, keyboard, cup of coffee, and cup of pens and pencils. My desktop isn't crowded but with the larger size it would start feeling cluttered I think.

The second reason that people like the small size is because it works different than a mouse. With a mouse you typically have your wrist resting and scroll the cursor by dragging the mouse as far as you can without lifting your wrist, picking the mouse up and re-positioning it and then scrolling some more. Most mouse movements are accomplished without a lot of movement. The table works differently.

The tablet represents the surface area of your monitor. And if you have two monitors, the surface of both monitors is represented. To click something in the lower left corner means you position the pen at the lower left corner of the tablet. Then to click something in the upper right corner you must physically move the pen to the upper right corner of the tablet. Even with the small tablet you still must move your hand farther than with a mouse; you can't leave your wrist at the same place and do a series of scroll movements.

With the larger tablets you're moving your hand even farther. After a bit that gets tiring or annoying (I'm guessing somewhat - I have the small).

On the other hand, if you're doing actual drawing or graphic design work, which I don't, people say that the larger size is better for that. 


Set up and Installation


Wacom Tablet Properties
The tablet is pretty easy to install. It comes with a CD or DVD of their software applications. One application is their "Wacom Desktop Center" which allows you to get and install updates, visit their store, etc. The other application is the "Wacom Tablet Properties" dialog which is where you configure the tablet.

The configuration is fairly straight forward. This tablet has four configurable soft keys on the upper corners that you can assign. The pen has a couple of switches on it that you can also assign.

I went to their website, registered my unit, and downloaded the software directly instead of using the included media, as a lot of other folks mentioned. By installing that version you'll be up to date and will likely save the time of installing off of the CD just to find out you need to download the most recent version anyway.

The unit also came with some other Corel software that you can download but I doubt if I'll use it. It also has a coupon for some free prints which I might use, but the software wasn't why I wanted the tablet. If you're already using Photoshop or Lightroom the Corel software probably won't be very valuable.

The one issue I had was that once the table was hooked up (this unit is a wired USB version but you can add wireless  functionality for about $40), my Windows 7 operating system installed it's own tablet drivers and the operation was strange until I uninstalled the Windows drivers.

As I mentioned, this unit comes as a wired device. For my desktop configuration I don't think the upgrade to the wireless system provides any benefit so I doubt that I'll get the wireless kit. I like that it's available and that I didn't have to pay for that up front if I don't need it.


The Tablet and Pen

The tablet is well built, in my opinion. This version only costs about $100 or less so keep that in mind. It's not terribly heavy but it's feet are grippy enough so that it doesn't move around on my oak desktop. There is a cover on the bottom that hides extra pen nibs and has the cavities for installing the wireless unit and battery. They imprinted information too so you know what the various areas are for. The tablet comes with a locking cable attachment too!

There is a small LED on the top that lets you know it's connected. The LED shines brighter when it's working too, which is kind of nice. As mentioned before, there are two soft keys in each corner. I am still working on getting used to using them but they work. When you click on one of them a display pops up at the top of my main monitor letting me know what's assigned to the keys.

The pen is where I have an issue. There are two switches on it, one of which a lot of people recommend setting up as a "right click", which I did. When you use the tablet instead of a mouse you'll find you want that right click, for example to right click on an image file to select opening it with Photoshop. 

The pen that comes with this unit is hard plastic. It spins in your hand causing the switches to rotate. And, when the switches are where you want them (I've been pushing them with my thumb), it still feels akward. When I push on the switches it causes me to move the pen tip. Plus, it's very difficult to tell by touch which switch you're pusing on. I wish they had a bigger gap between the pen switches as well as a bump on one of the switches so you could identify them by touch easier.

I saw someone else post a tip where he added some gummy pencil grips to help. I have done that too. The gummy type work good because they stretch and are easy to trim. You'll want to trim them so they don't cover up the switches. I put a full size one on the upper end of the pen so that it rests where the pen lays in my hand. This tip helped a lot but I still find the pen akward. It doesn't feel natural or like a writing implement I would choose for anything else. But it's now more usable since it doesn't spin around. One more note - I wish I had grips that were not round so that when I lay the pen down it doesn't roll away.


So how does it work?

Again, I don't have a lot of time with it. I did work on an image for quite a while yesterday, watching YouTubes regarding configuring Photoshop brushes to be controlled by the pressure sensitivity. I'm still learning that aspect. 

What I can say, however, is that using the tablet is certainly different than using a mouse. I put my mouse up and am trying to get to where all I use is the tablet. It's hard to do certain things and I may not keep up this practice. I find it hard to copy and paste text. Even though I have a pen button set for a right click, I have a lot of problems with it. I configured one of the tablet soft keys to use as a right click and I have better luck with it. That alone is about enough to make me not want to use this as my sole pointing device but I'll keep working with it.

I also find it harder to pick up the pen and use it than reaching for a mouse. I don't know where to put the pen when I lay it down, for example to type. My desk is level but still the pen seems to roll away, like next to the keyboard, and then it takes more effort to dig it out than a mouse sitting patiently waiting for me grip it again.

The tablet supports various gestures similar to a laptop touch pad. I don't use a laptop so I'm not very familiar with that. I'm learning that and sometimes it's easier to use that way than using the pen. This is especially true if the pen has wandered away. Note that I generally have very little light on in my studio room and the unit is black - it can hide pretty easily!

One of the options the tablet has is to configure the mapping of the tablet to your monitors. I have mine set up to be "proportional" - the relative size of my two monitors is mapped to the tablet which means I'm not using the full surface of the tablet. I like that set up so far. You can even map into a smaller area to reduce your hand movements even more.

On the other hand, regarding actual post processing, Iike it better than a mouse. On the image below I used the brush to darken and add contrast to the clouds and the small hills in the background. You can see what is happening on screen as you draw with the pen, including how the pressure affects the size of the brush. It was much easier to draw along the hills than with a mouse. I used a brush to do some dodging and burning, and again, I really like how the pen works for that over a mouse. 

I can see that the drawing part of post processing is better. I just have problems with other controls, especially with cropping. But I'm willing to try to learn that. And, if you have the room on your desktop, there's no reason you can't have the mouse and tablet both hooked up. I have a feeling that I'll end up using that configuration. 

The bottom line for me after about a week is that I really like the unit for working with brushes in Photoshop (I haven't tried using Lightroom with it yet) but I find the other actions (copy and paste, right click, etc.) more difficult.


Photograph of Tucson, Arizona
Edited with the Wacom Intuos Photo - Small


Saturday, May 28, 2016

AF-S NIKKOR 200-500mm f/5.6E ED VR Review - Part 2

Well, I finally got out and shot a few frames with my new AF-S NIKKOR 200-500mm f/5.6E ED VR lens today! As promised, I'll post a bit of a review with some of my thoughts and experiences using it...

Note that in all of the photographs below I had the VR (Vibration Reduction) off since I was shooting from a tripod.

Nikkor 200-500mm f/5.6E

The Physical World


If you've read anything about the lens you've probably heard it's heavy and big. I certainly don't have anything else like it.

It's weird mounting the camera to it. The lens is heavier than the Nikon D610 (I haven't tried it on my Nikon D3200 yet). I had the lens sitting face down in the bag I'm using to carry it (an Amazon Basics Camera Backpack, which it about fills up). I mate the D610 to the lens and rotate the camera.

I carry the system by either the lens or the tripod mount on the lens.

When I get the lens mounted in my Manfrotto 468MGRC5 Hydrostatic Ball Head sitting on top of my Manfrotto 055XPROB tripod, it is solid. This ball head is paying off now! It's weight capacity of 26 pounds (12 kg) is really not being stressed and the ball head holds the system. The lens (~ 5 pounds) plus D610 (~ 1.6 pounds) is less than 7 pounds total (even with 2 SD cards!).

I did increase the "Friction" setting of the ball head to reduce the amount of play in the head when I loosened it - with that amount of weight the lens does tend to want to sag more. But when the "Friction" is set right, I find that the camera and lens are pretty well balanced. I had no problems at all. I did need to crank on the main knob more than with my other lenses to prevent the lens from drooping after letting go but once you realize that it was no big deal. I don't see a lot of love for this ball head but I sure like it.

Dolly Steamboat on Canyon Lake
Nikon D610 + Nikkor 200-500mm - ISO 100 ■ 500mm ■ f/7.1 ■ 1/160s

Increase the Shutter Release Delay


I didn't get out my IR remote shutter release and instead just used the delay on the manual shutter release button. I noticed by looking through the view finder, however, that when I pressed the shutter release, the camera wobbled more than with my other lenses. I changed the delay from 2 seconds to 5 seconds to compensate - letting the camera settle down before releasing the shutter. I didn't notice the issue in my photographs so maybe it was actually still within the 2 seconds but since I was shooting a lake and desert hills, I felt the extra 3 seconds before the shutter release wouldn't hurt.

Using the wireless remote would probably work fine, unless it's windy. There was some breeze at the lake (Canyon Lake near Apache Junction, AZ), but not enough to visibly affect the camera. I didn't try cranking down harder on the ball head either - that's a chore for next time I guess.

Nikon D610 + Nikkor 200-500mm f/5.6E
ISO 100 ■ 500mm ■ f/7.1 ■ 1/125s

Auto Focus


As I mentioned in a recent post, I use back button focus. I didn't have any issues using that with the shots I took. It didn't hunt around at all. It acquired focus with no questions asked and it appears to be pretty good. Granted it was a sunny, 97 degree Fahrenheit day in Arizona. I used an aperture of f/7.1 just to get off of the f/5.6 and to get a bit more depth of field.

How's the Focal Length?


I didn't get a chance to shoot any wildlife so I can't comment on that directly. What I can say is that from the Acacia picnic area I wanted to shoot the opening across the lake where the Salt River continues down stream. I couldn't get it all in the frame at 200mm. It made me wonder if the Sigma or Tamron with that extra 50mm at the short end would have allowed me to get the shot.

Nikon D610 + Nikkor 200-500mm f/5.6E
ISO 100 ■ 200mm ■ f/7.1 ■ 1/160s
Instead, I was able to compose the shot with the sheer wall on the right which is interesting.

In the photograph to the left I've purposefully left the full frame even though the water line isn't horizontal. I wanted to show the difference between the 200mm and 500mm focal length. This is the full image (okay, reduced to a max of 2040px wide for the web).

I did use some post processing in Lightroom, and did increase clarity as well as sharpening - just using Lightroom.

Here's a shot of those mountain peaks at 500mm, from the same location (I didn't move the tripod, just zoomed in to the 500mm focal length).

Nikon D610 + Nikkor 200-500mm f/5.6E
ISO 100 ■ 500mm ■ f/7.1 ■ 1/200s
I know these aren't great pictures; no one is likely to hang these on their living room wall. That's not the point. I wanted to see how the lens performed and how that 500mm could come in handy. I think I see opportunity here. I've shot landscapes in the past where I wish I could fill up more of the frame with a mountain, for example (like Humphreys Peak near Flagstaff, Arizona). This worked pretty good!

Basically, with a 200-500mm zoom, you should be able to increase the size of the subject by 2.5 times.

Lesson Learned - Update your Camera

One thing I figured out was that I needed to update my camera firmware. When I opened my files in Lightroom it didn't find the lens profile (well, I found out I also had to update Lightroom CC - it wasn't using the latest version of Adobe Camera Raw).

When I looked at the properties of the NEF files the lens information was missing.

I remembered that I'd seen updates to the camera firmware but hadn't bothered with them because I my lenses were already supported. This Nikkor 200-500mm only came out less than a year ago, though, and my cameras didn't know about it. I updated the Distortion Control software on my D610 but on the D3200 I had to do the Firmware and the Distortion Control software.

Now things are cookin'!

The Bottom Line


I'm happy so far with the lens - I think I'll keep it. I really wanted to try it to see if I liked it or whether I should send it back to Adorama but it looks like it's part of my bag now. I just wish it fit in the bag!

Another set of 200mm and 500mm shots for you to ponder. These don't have much processing at all and they both have the same processing. I just think it's interesting to see the difference in composition at both ends of the lens.

Nikon D610 + Nikkor 200-500mm f/5.6E
ISO 100 ■ 200mm ■ f/7.1 ■ 1/200s

Nikon D610 + Nikkor 200-500mm f/5.6E
ISO 100 
■ 500mm ■ f/7.1 ■ 1/250s