Showing posts with label photography. Show all posts

Saturday, December 31, 2016

Goodbye 2016!

Happy New Year!

Okay, it's still 2016 but only for a few more hours in Phoenix, Arizona, U.S.A.! This will be my last post of the year to my blog. I recently posted somewhat of a review of my photographic year and it'll have to do. Now it's time to pop the cork on some bubbly, watch the ball drop, and maybe, if I'm lucky, kiss the wife (probably mine!).

Updates to my Post Processing Online Book


I haven't been out photographing for a while, instead I've been working on a couple of eBooks about photography.

This picture says it all!
I've already made my "Randall Morter’s Awesome Photography Post-Processing Notes" eBook available, and you can get to it at any time using the link on the right hand side of this page.

I've been adding more content and I think it's starting to have some value. I've added some details about exposure along with a bit of a tutorial including some processing notes for one of my photographs of Panguitch, Utah. 

I'd really like to hear from you regarding whether you find it useful or not. Especially now that there are likely some people that got their first DSLR for Christmas a week ago! How exciting that must be!


Thank you!


Thanks to all of you who have read my blog this year. I hope you found it interesting or that it had some useful knowledge.

I hope you and your families have a wonderful new year visiting beautiful places that you've never seen before or never seen in the same way. And be sure to take lots of pictures!


Tuesday, December 13, 2016

Tether Tools Case Air

A New Toy


Er, a new essential piece of photography equipment, that is. I posted a recent blog about not needing anything for my photography addiction, but I guess I was wrong. I was watching Scott Kelby's "The Grid" Holiday Gear Guide (Episode 260) (https://www.youtube.com/watch?v=Sh_39bWAack&t=198s, about 27:50) while having dinner and he mentioned 1 or 2 things I think I must have. So, I got one of them...

Tether Tools Case Air - What it Is
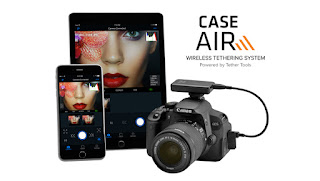

Tether Tools Case Air
The Tether Tools Case Air is a wireless tethering device that attaches to your camera via the USB connection (not the "accessory connection" that my GPS connects to) and can mount on the hot shoe or external flash mount, as shown in their advertising photograph at right. They also provide a lanyard that allows you to hang it from the camera strap connection.

The Case Air transmits and receives data via its own WiFi, connecting to your devices that you likely already own such as a smart phone or tablet or desktop computer. They have free software called "Case Remote" for both iOS and Android smart phones, as well as for PC and Apple computers.

Tethering allows you to use software on your device of choice to view the live view image that the camera sees, adjust many of the camera settings including and especially the aperture, shutter speed, and ISO, focus, and you can press the shutter release and the image is uploaded to your device! That is too cool! It does not provide control over zooming, panning or tilting.

I know there are other solutions out there, but this device is only $159.99. There is the CamFi for about $100 and the CamRanger for about $300 and I haven't used either one. Scott Kelby got me interested in this unit and when I found out they're here in Phoenix, that made up my mind to try their unit.

Why I had to have it


Tethering is a very nice thing to have in a studio for a few reasons. You can control your device while it's on a somewhat fixed tripod. Because of the file upload, you can rapidly show your client the images or you can quickly import them into Lightroom. With wireless tethering you avoid having cables on the floor to trip over or that may come loose from the camera or remote device.

I don't do studio shooting though, I do mainly outdoor shooting.

One of my problems is when I want to have the camera down low, perhaps only a few inches off of the ground. I often have a hard time laying down and looking through the view finder or even the live view monitor. Part of it is because of age and the shape I'm in but another part is because of the rocks and prickly things there are on the ground in the desert areas that I tend to shoot photographs.

I've seen other options, such as the Nikon DR-5 Screw-In Right Angle Viewfinder for $200, or external monitors. But for a lower price, the Case Air also allows me to adjust focus and take the picture remotely. I can't wait to get out and try it!

Purchasing My Unit
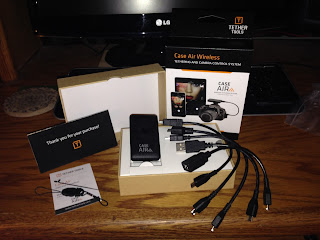

My Case Air Wireless after unpacking
I went to the Tether Tools company headquarters at 2202 E. McDowell Rd, Ste 5, Phoenix, AZ 85006 to shop for my copy. Josh brought one out that was hooked up and ready to go. Everyone there was very nice and helpful. This is not a paid ad for them, I just thought it was cool to meet their staff and get the unit from its birthplace.

When I got home, I first plugged the unit in to charge the battery, only to find out there was already sufficient charge to start using the device.

I plugged it in to my Nikon D610 and fired everything up per the instructions (I'd actually installed the software on my iPhone 5 the day before). When you start the system up it checks to see if a firmware update is required for the Case Air and it checks to see if an update is required for the remote device. In my case it let me know a firmware update was required so I installed it per the instructions.

Afterwards I needed to shut everything down and restart and then I was controlling my camera from my iPhone! Everything seems to work as advertised and I'm pretty happy so far. I'll wait until I get it out in the "wild" before saying much more about the performance.

It's nice to get a piece of gear that actually does what it advertises (most of my photo gear has been great that way). This actually surprised me a bit...

Surprise!


I had read a lot of the downloadable manual but had glossed over the details about the bracketing, HDR, and focus stacking shooting.
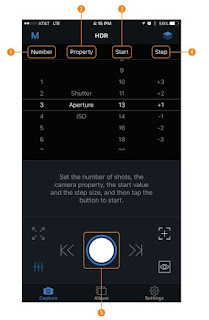
Case Remote Software
HDR Control Panel
from Tether Tools Manual
I don't get the difference between the bracketing and HDR modes, except that with the HDR mode it will cause your camera to shoot up to 9 images where it changes aperture, shutter speed, or ISO between exposures. You get to choose which exposure aspect you want to change and by how much. The bracketing mode is similar but with only 3 shots. It seems redundant to me - I think the HDR feature should be called bracketing and the existing bracketing function is unnecessary.

But, my Nikon D610 only offers 3 shots and I've often wished I had more shots like the 5 on the D810. Now, with my Case Air, I've got up to 9! And, since I can control it remotely, I don't have to touch the camera in order to change things, for example if I wanted to shoot a burst of "HDR" shots by changing the shutter speed and then wanted to try another burst where the ISO changes. Surprise!

I don't have any functionality built in to my D610 to do focus stacking and I'm not aware of any camera that does. This is really cool and is another surprise! Again, you can select to shoot up to 9 images where the Case Remote software changes the focus between each shot. I've recently been discussing focus stacking with a fellow photographer (actually he's mainly a videographer) and this just seems really amazing.

Additional Notes


Another couple of things I noticed about the system are:

  1. The software doesn't work well when the D610 is in a "user" mode (U1 or U2). I couldn't control the camera until I switched to the "manual" mode (M), which is basically the same as a user mode.
  2. That's okay because you can store a lot of camera settings in the Case Remote software including auto focus settings, and you can name and load settings in Case Remote. That means you could save some settings for wildlife vs. landscape.
  3. The software does not upload RAW files to iOS devices (Josh informed me of that). That means you can't zoom in on an actual image UNLESS you shoot it as JPEG (or in my case RAW + JPEG at a minimum). That sounded like a drawback until I noticed you can flip between shooting RAW and JPEG format quickly on the Case Remote software - you can change to JPEG, shoot an image, upload and inspect, adjust and repeat as necessary, then switch to RAW to take your "real" file. And, if desired, you can delete all of those JPEG files from the Case Remote software! That is convenient!
One final note - I also installed the Android software on my Samsung Galaxy Tab 4 tablet that I use with my DJI Phantom 3 Advanced. The software installed and worked fine on it too but there are differences. The iOS version has more controls available and the layout is a bit different. However, the Tab 4 has a much bigger screen than the iPhone 5 and it allows you to upload RAW files (not that you can do anything with them once they're on the Tab 4). I just wanted to mention that the software works well on those 2 devices. I haven't tried it on my PC yet.


Wednesday, November 30, 2016

I Got Everything

I recently got the new B & H catalog. I recently perused through the YouTube suggestions (based on my viewing history). I recently cleaned all of my gear before going to Bryce Canyon National Park. In all cases it made me think about my gear, and even more importantly, that there's nothing I can think of that I need to add! That must mean that I've arrived!

I wrote and recorded a song 5 years ago called "I Got Everything" that comes to mind although that song is more depressing than this issue about photography gear (if you go to the page, http://www.poppavein.com/RRhythmia.aspx#IGotEverything, you can  click on the ">" image left of the song title to stream the song.

My D610 with an old Nikkor 70-210mm F4-5.6D
and my Opteka GPS unit
I can look through the B & H catalog with only mild interest because there's just nothing that I want to get. Oh, if funds were unlimited I might buy a big format printer, perhaps a Nikon D5, or even some faster Nikon lenses. But frankly, at my age of a certain age (or at least approaching a certain age), I am trying to get rid of possessions (such as my music gear!).

This last summer I toyed with the idea of getting a Nikon D810 when I found them online (at B & H or Adorama or somewhere) for about $2,000. I believe they were re-furbished but I'm okay with that - my Nikon D610 is refurbished. I've had it for 2-1/2 years and the only problem I've had with it is due to letting a co-worker handle it and he twisted the mode switch without pushing in the lock and wore it down.

Nikkor 20mm f/1.8G ED Lens
After thinking about it and reading more reviews, the D610 is considered to have better low-light image quality and since I prefer shooting low light images over other images, it just didn't make sense to pick it up. Instead I added the Nikkor 20mm f/1.8G ED lens. That saved me about $1,200 and gave me a wide angle f/1.8 lens!

On the one hand, my lack of desire for additional gear means I don't have to spend money. On the other hand, I kind of miss the excitement I had when I first started this hobby - finding new pieces of equipment I thought I had to have, researching which equipment to buy, ordering it, unpacking it, and finally, using it!

If you're just starting to get involved in photography, I'm jealous! Enjoy and savor your adventure.

Monday, November 28, 2016

Trying to stay motivated

Stagnation


Since my problematic trip to Bryce Canyon National Park (see my November 21, 2016 blog) I haven't been motivated to get out and shoot anything. I'm in a photographic doldrum.

I've been searching and reading on other sites for cures to this malaise regarding getting outside with my camera, and some of the tips have been okay. They just haven't been enough to push me back over the edge into getting out there.

Attempts at Overcoming


Photoshopped image of my dog Elmer
Wilcox Playa, Arizona
I have tried watching videos of photographing or hiking areas on YouTube or other services with the hope that they would spur me to visit the places or somewhere similar. One video was shot partially in the Utah salt flats and gave me a mild yearning to get back down to the Wilcox Playa in Arizona (near, surprisingly, Wilcox, Arizona).

I still think that area has some photos to offer if I was just a bit more creative. I saw a similar shot taken in a location like that with a sweating bottle of water or something as a foreground object with the expanse of the playa in the background. Plus, I like that area for some reason. It's the gateway to the Chiricahua National Monument which may be the attraction for me.

Last Friday, the day after Thanksgiving 2016, I worked. I woke up early, grabbed my camera and tripod, and got in to the high-rise that I work in on Central Avenue in Phoenix, Arizona. Since moving there this last summer I've been wanting to see if there were any photographic opportunities possible by shooting out of the windows. I work on the 23rd floor and also have access to the 16th and 19th floors.

Unfortunately there were not any good shots of the downtown high-rise buildings and the other buildings around mine didn't have many lights on. There just wasn't a shot that inspired me to even get my camera out of the bag. I even went down to the street to see if it would yield anything but I didn't like any shots there either. The only shot I envisioned at all was a long exposure with car tail lights but because it was a holiday day there wasn't much traffic. I gave up there too.

I've even tried flushing my mind. I've had dry spells before when I was writing and recording music and often the thing that got me rejuvenated was completely forgetting about music for a while. The time length varied, too. I'm trying to do that still with the photography but it's hard to forget about it.

Remedy?


Superstition Mountains
If nothing else inspires me before this next weekend, I'll at least try going out to the Superstition Mountains. Perhaps I'll even try staying in the Lost Dutchman State Park overnight.

That place usually offers some sort of photographic opportunities. And I still don't have any golden hour shots from Tortilla Flats which I think could offer something. Perhaps even Roosevelt Dam,

It's not that there aren't some photogenic locations pretty close to Phoenix, heck, I wouldn't even mind the drive back to Joshua Tree National Park.

I can't blame the scenery - I just need to get back out to it!

Thursday, November 10, 2016

Free Photography Location Notes Form

Photography Notes Form


Photography Notes Word Document
As a follow up to my last post about preparing for a visit to Bryce Canyon National Park, I (finally) took the time to create a Word document that I can fill out with notes about my destination. I've been wishing I had something like this for a while and I'm going to see if I like this form.

If you're interested, you can download my document (http://www.PoppaVein.com/files/PhotoLocationNotes.docx) to see if it's anything you can use. It's written with Microsoft Word 2013.

You can download the word document, save it to your computer, and fill it in when researching a photography destination. You can enter as much or as little detail as necessary. I wish I'd had something like this prepared when I went to Yosemite National Park for the first time. There are a lot of places to see and having some notes about where to go would have made things easier.

Bryce Canyon National Park Notes


I've filled one out to use at Bryce Canyon National Park, including some notes from the site I mentioned in a previous post from Bret Edge : PHOTOGRAPHER’S GUIDE TO BRYCE CANYON NATIONAL PARK.

If you're interested, you can see what I've filled in by downloading it (http://www.poppavein.com/files/PhotoLocationNotes-Bryce.docx).


Tuesday, November 1, 2016

Quick Post about Equipment Reliability - Updated

I just have a quick post regarding a thought I had today. It must have been a quick thought too!


Tony & Chelsea Northrup on YouTube


I saw a YouTube from Tony and Chelsea Northrup addressing the question "Are Camera Reviews a Waste of Time?" I enjoyed and agree with a lot of the points they make, but somewhere during the course of the video it led me to another thought...


Third Party Devices


I remember when I was first getting into this expensive hobby that somewhere I saw a discussion about what type of additional batteries are good. One person (or perhaps more) said that they'd had issues with 3rd party batteries but others had experienced satisfactory results. One or more others said that they only bought their camera manufacturers batteries and none of them had experienced any problems.

First Party Reliability


Based on my research, I decided to buy Nikon batteries for my additional batteries. Likewise for my lenses. I have bought a few non-Nikon items when the cost just didn't seem to justify the likely results. You can see a list of most of my equipment on this blog by clicking on the "My Gear" link on the lower right side of this page.

In more than 3 years of pursuing photography and spending more than $10,000 on equipment, I can say that I have had very little go wrong with any of the things I've bought. In fact, there are only 2 items that have had issues:

  1. Level indicator that mounts on the shoe
  2. Opteka GPS
The level indicator was one of those cube types with the 3 way bubble indicators and green fluid. I used it a lot on my Nikon D3200. I'm not sure what happened to it but one time when I went to use it the fluid had leaked out. It had cost maybe $5.00. I haven't replaced it because I mainly use my D610 and it has an electronic level indicator that I use.

The Opteka GPS broke because of my actions. It mounts on the shoe too, and I often left it mounted. One time I put the camera in the back of my car with the GPS still mounted and eventually either the camera slid or I sat something else on top of it. The damage was not due to the device. That device is about $35 or so (note: I decided to buy one of the cheaper brands instead of the Nikon brand because the Nikon GP-1A GPS Unit is about $250 and sticks out of the camera in an even more awkward manner. I could buy about 7 of the Opteka units for the price of the Nikon unit).

All in all, I have to say I've had great experience with everything on my list. And, being hardware, I've had little frustration - unlike my experience with software during that time! I still think it's probably better to buy name brand when possible but for the cheaper things I've bought I have not been let down there either.

Update, 12/6/2016


Hakuba PSTC200 Tripod Case
Get this one!
I remembered another item that I had issues with, a VidPro 35 inch Tripod Carrying Case for $14.95. I may have used it for a year before it fell apart. The cheap zipper came apart at some point but I could still carry my tripod in it to the car and it provided a bit of protection. I don't use the tripod bag out of the car - I just store my tripod in the bag in the house and use the bag to carry the tripod, the tripod strap, a cleaning rag, a screwdriver, and the Manfrotto socket wrench. When I'm shooting, I either just have the tripod on my back with the tripod strap or I'm carrying it in my hand. The bag just provides a bit of protection on the floor of my car in the back seat.

At any rate, the VidPro is junk and a waste of money. I replaced it with a Hakuba PSTC200 Tripod Case from Adorama for $37.79, about 3 times the cost of the VidPro but well worth it. The Hakuba is wonderful. Heavy duty zippers, much thicker padding, and room enough for two tripods.

Monday, October 24, 2016

Photographing Solo or with a Group?

Me and my dog Elmer at Chiricahua National Monument

Man's Best Friend


One thing I struggle with regarding my photography excursions is how I often wish I had someone to talk to besides my dog Elmer. He is a fantastic listener, never interrupting my discourses, but it seems like he doesn't contribute much to our conversations. Perhaps he's shy or intimidated by my wealth of knowledge!

When I started on my photographic adventure in August of 2013, Elmer was there to share in the experiences. He patiently waited next to me while I shot photographs of a gully in northern Arizona for probably two hours. Okay, he wasn't real patient - since we were just starting out he didn't realize that I didn't like him wrapping his leash around the tripod legs. Eventually, however, after three years or so, he's gotten really good at staying away from the tripod.

The Yin*


Campsite at Pine Flat Campground, April 3, 2015
Oak Creek, Arizona
During that same three years I've found myself wishing for more human interaction in my photography trips. In 2015 I was able to get out close to every weekend and a lot of those were over-night trips. When I did set up camp somewhere I really found myself wanting someone to talk to during the times that I spent sitting at the campsite, especially if they could talk photography and even better if they could teach me about photography.

I have made new photography friends and especially enjoy learning from them. I fantasize about going on weekenders where I watch them get amazing photographs and see how they go about it. Can you imagine what would it have been like to tag along with Ansel Adams or Galen Rowell?

Instead, it has been me and Elmer for most of my photography outings. As you can see, he's exploring our campsite in the image above. And, on a side note, he's also the only one that sits in my studio room at home while I process the images. Well, one or more of my other three dogs might join in at times. Elmer, however, is always there beside me; he got his name from Elmer's Glue - he's white and he sticks with me.

The Yang*

I have tried going out with one or more photography friends on various trips, all of which were just day trips. I've invited photographers on overnight trips too. I've had one person accept an invitation in three years for a short visit to Canyon Lake. I had another outing for some night photography that a couple of friends accepted. That's 2 outings with 3 people in 3 years.

On the other hand, I've accepted invitations from others and gone out with them to shoot places or things they were interested in. I've even looked into local photography groups and tested the waters with one to shoot the Perseid Meteor shower.  I have had or tried some "group" outings. And, I have enjoyed some of the discussions I've had during those shared experiences.

Channeling my Inner Hermit


While I still go back and forth on this issue, I really think that I end up producing more when I'm alone. I have read online, for example in a DP Review forum discussion, how a number of other photogs gravitate to this conclusion as well.

While it's fun to talk about camera and other equipment, even when I've been out with others I find that we don't set up our tripods next to each other. There are no 3-legged bonding moments.

Personally, when I'm shooting, I like to concentrate on what I'm doing. Perhaps it's because I'm getting older and have a hard time multi-tasking, especially compared to when I stood Officer of the Deck watches in the Navy. I have the exposure and composition considerations going through my head when I'm looking through the view finder. I have a hard time dealing with distractions at those moments, especially if the shot is tricky at all like when shooting the moon or milky way.

When I've been with groups I've found that either someone else is right where I want to shoot from or they're not at all where I want to shoot from so I walk away. They're either talking when I want to concentrate or they're concentrating when I want to talk. They're shining bright flashlights around at night when I'm doing a long exposure. They want to go on a trip to shoot mid-day wildlife while I want to shoot early morning sunrise landscapes.

Me at Seal Rock, Oregon, 8:52 PM
It could be that there is someone that shoots exactly like I do and is willing to get out of the house when I do for as long as I do. But that would be like finding the perfect spouse!

I enjoyed myself last year when I was on the Oregon coast. I could stay on the beach in the dark and cold until I no longer wanted to shoot and when I left no one was complaining that it was too soon or too early to leave.

I can take a break to eat when and where I want or decide to only eat the Jolly Ranchers and jerky I normally have in my Explorer. I can decide to call it a night and settle in somewhere at any time or I can decide to drive around the next bend to see what is waiting.

I think it might be good to go on a trip with another photog if they drove themselves and if we tried to meet at some point during the middle of the day. But I like to shoot sunrises and sunsets and night shots. I'll shoot mid-day if there's nothing I can do better, such as when I'm travelling and I'll only be at a certain location during the day like when I drove along US 395 beside the eastern edge of the Sierra Nevada last September. I was in Lone Pine during mid-day only. I didn't even take my DSLR out of its case. That kind of sucks too, because I liked Lone Pine more than any of the other towns along Highway 395 for some reason.

I'll keep extending invitations for photography trips once in a while but with the response I've had, I've kind of quit doing much of that. Likewise I may accept an offer once in a while to go with someone else when they ask. But because I tend to prefer wandering off by myself anyway, I'm just not that excited about invites. I like sharing my photographs but I think that the process of capturing them is more of a private thing. Well, I will likely take my dog Elmer!


* In Yin and Yang, Yin refers to the dark or cloudy while Yang refers to the bright or sunny.

Sunday, May 22, 2016

A short post about Back Button Focus

I am mainly a landscape photographer. My subjects don't often move around much. Consequently, for some time now, when I use auto focus, I've been using "Back Button Focus" on my Nikon D610. I think I've been using it since shortly after getting the D610. I like it.

Hey - why use Back Button Focus?


Most DSLRs (Digital Single Lens Reflex), as far as I know, allow you to press the shutter release half-way down so that the camera can focus on whatever is in it's cross hairs. Note that different cameras and different modes can cause the camera to focus at different areas of the image. I typically use a single focus and metering point so that's what I'll assume here.

When you press the shutter release half-way down and the camera locks in on the focus, you can then move the camera while still holding the shutter release half-way down in order to recompose your shot. For example you might focus on your significant other in the center of the shot and then pan a bit to get more of the Grand Canyon. Once you have the composition you like, you can press the shutter release the rest of the way to take the photograph.

That is pretty convenient, allowing the camera to focus on one thing and then to re-compose the shot after the camera has gained it's focus.

One problem with that technique, however, is that you have to keep the shutter release depressed half way in order to preserve that focus setting. If your finger slips off of the button you have to start all over. So what if you've panned a bit and then someone else steps into your shot? If you want to wait for them to leave, you've got to keep that button held down. 

In landscape photography I often want to focus on something, say a cactus in the foreground, and then re-compose. I may want to try 20 different compositions. And, I use a tripod for almost every shot I take (at least if I want them to turn out I do). Using the "normal" half-pressed shutter release can be a pain in the rear end (so can sitting on cactus).

Another issue with the "normal" focus is if you want to avoid camera shake due to the shutter release, for example if you use a remote release. If you have to hold the shutter release down part way and then trigger the shutter release it can cause unwanted vibration or motion into the camera.

This is where back button focus can help out...

What is Back Button Focus?


Back Button Focus allows you to configure a button on the back of the camera to use as a focus lock. It basically takes the place of the half-press action of the main shutter release button. You move your focus point(s) onto the subject as normal but instead of pressing the main shutter release button half-way to engage the auto-focus, you press the button on the back of the camera. Then, you can let go of that button - the focus will still be locked in. It won't change again until you press that back button again.

The cool thing about this is that you don't have to keep your finger on the button. The camera can even go to "sleep" - the focus of the lens won't be changed.

You can focus on your subject and take multiple images with different compositions and you won't need to focus on the subject again unless it moves. This is great for landscape photography where you can focus on a foreground object and as long as your camera doesn't move much (less than the depth of field) you can recompose without focusing for each shot. There is less time between each shot.

I use manual focus a lot too, but I still often will start with a press of the back button to get the lens either right where I want it or at least close and then I may focus slightly different for one reason or another.

Nikon D610 Back (Official Nikon Image)

How can I set up Back Button Focus?


Most DSLR cameras, at some level above the basic level, have a way to program one of the BUTTONs on the BACK of the camera to work as a FOCUS button. In the case of my D610, I use the "AE-L/AF-L" button, to the left of the rear thumb wheel.

You can usually find out how to set it up by doing a search on the web if your camera instruction manual doesn't outline it (or if you can't figure it out from your camera manual). Here's an example for the Nikon D610 Back Button Focus setup

Anything more you can tell me about this?


Luna the Barn Owl - most of him anyway
This subject is on my mind because of my outing at Arizona's Raptor Experience last weekend. I shot a number of images like this one - see anything wrong with it? When I got home I found a number of shots where the feet were cut off.

The problem was, I realized and figured out after shooting 400 pictures of raptors, was that I was setting my focus point on the bird's eye, using the back button focus, and not re-composing or even noticing that I was cutting off the toes of these fine feathered friends. 

I'll admit, it was a little nerve wracking at the shoot. I suppose the more you do it the better you get. But I was paying $190 for the trip to shoot the birds and that added some pressure. I rarely shoot animals successfully and that added more pressure. And the pressure prevented me from getting great shots. 

At one point, when we had some time with a flying hawk, I had to figure out how to get out of back button focus and to let the camera do it's job. Those photos turned out ever worse. I got zero usable shots of the hawk in flight.

My tip would be that, if you start using back button focus, it still is a good idea to practise the other auto focus modes of your camera if you have a chance. Especially if you know you're likely to be needing it at some point in the future.

Monday, December 28, 2015

Considering the Nikkor AF-S Nikkor 200-500mm f/5.6E ED VR lens

I have had my eyes on the new (relatively new, it was announced in August 2015) AF-S Nikkor 200-500mm f/5.6E ED VR lens. It looks like an amazing lens. I just haven’t been able to pull the trigger yet and I don’t know why.

This lens has great reviews from just about everyone on the major sites such as Adorama, B&H Photo, and DP Review. Even Ken Rockwell had good things to say about it. I’m waiting for Thom Hogan’s review but he hasn’t posted much – but he has hinted that he likes it.
Nikkor AF-S Nikkor 200-500mm f/5.6E ED VR

I’m not going to go over the specs of the lens; you can read details about the lens at many other and more informed web sites. But I will mention why I want it and why I’m hesitant to get it.

I have shot enough to know that at times I wish I had a longer lens. In particular, this last summer on my trip along the Oregon coast, I shot some sea lions from distances that I would like to have had more reach available. By the time I shot and cropped what I could shoot with my 200mm lens, there wasn’t a lot of image left.

For my Nikon D610 I have the Nikkor 70-200mm f/4G (with the lovely gold band) and like it a lot. I had a plan to get the Tamron 150-600mm but a friend convinced me that the 70-200mm was a better lens, that I’d like the image quality (IQ) better on it. So I went that route and haven’t been disappointed at all with my choice other than the lack of reach.

When the Sigma 150-600 came out and had reports or reviews that it had better IQ than the Tamron, plus it had the docking station available to get firmware updates, and the lower priced version was right even with the Tamron, I started thinking that I’d pick one of those up. I was more interested in the less expensive version, not feeling that basically doubling the price was worth what the “sport” version offered for how I shoot.

Then, this last August, Nikon announced their 200-500mm lens. This is a tough call. It’s a little narrower focal range than the 150-600mm. That means that on the short end I might be able to use the Tamron or Sigma for a particular shot but I may have to swap out the Nikkor to my 70-200mm if I really wanted to be shorter than 200mm. If you’re backed up against a wall or cliff and want to include more of a scene than 200mm will allow, the choice is to swap lenses or compromise on the composition. Or, have the Tamron or Sigma.

On the long end, 100mm extra on the Tamron or Sigma probably wouldn’t be noticed quite as much. I might have to crop the Nikkor shot a bit if I needed to remove something from the shot that I couldn’t get rid of through extending the lens that extra 100mm but it wouldn’t be nearly as bad as the difference between the 200mm maximum I have now compared to the 600mm of the Tamron or Sigma. That’s 3 times the distance or 200% increase! Between the 500mm to 600mm there is only a 20% increase.

Nikon has a cool angle (or field) of view simulator that you can also use to see the dramatic difference (or lack of difference) between focal lengths. It is online at:

http://imaging.nikon.com/lineup/lens/simulator/

For a full frame camera, the diagonal angle of view for 150mm is 16.4 degrees and for 200mm it is 12.3 degrees which is fairly significant. The diagonal angle of view at 500mm is 5.0 degrees and at 600mm it is 4.1 degrees. That end is not very significant as can be seen on the Nikon simulator.

The Nikkor is somewhat more limiting at both ends when compared to the Tamron or Sigma. The difference is that Nikon can fine tune the optics easier since they are providing only a 3x zoom, compared to the others that are a 4x zoom. This is born out in the reviews where actual users state pretty convincingly and in sufficient numbers that the Nikkor has improved IQ.

In addition to the focal length, the Nikkor also offers a larger and constant aperture of f/5.6. By comparison, the Tamron and Sigma aperture is f/5 to f/6.3.  The Nikkor will support using a teleconverter, if desired and your camera supports it, at all focal lengths while providing auto focus.

All three lenses have image stabilization by the Nikkor claims that their new version offers 4 stops worth of stabilization. All of the lenses expand and contract according to the focal length so they’ll all have breathing to do.

My biggest factor in my photography is striving for IQ. Because of this, I believe that the Nikkor is the best choice for me. I’d rather swap a lens at the short end and gain any edge in IQ. I’m still a Nikkor only guy with my lenses and have been pretty satisfied with all of them. And, if I mount the 500mm focal length on my D3200 I end up with a 750mm equivalent!

Okay, I’ve convinced myself regarding WHICH lens to get, I just need to convince myself that I truly need a longer lens. I think I need one more photo shoot where I come across a situation that I could ACTUALLY benefit from a longer lens. Once I do, I think I’ll order a copy!

P.S.(es)

1.  Purchasing this lens at roughly $1,400 US will be my third lens of $1,000 or more. In fact, all told I think it would mean I will have spent about $3,600 on lenses ($1,000 for the 16-35mm f/4, $1,200 for the 70-200mm f/4, and the $1,400 for the 200-500mm). This is after having been into photography for less than 3 years. Also note that I have my eye on the Nikon D810 which is also about $3,000. Sheesh. I may need to sell a guitar or two!

2.  I don’t use my D3200 crop camera enough. Next time I want more focal length I should really get out the D3200. I actually have the 55-300mm DX lens, which provides an equivalent of 450mm at the long end. I’ll admit that I did NOT get that rig out when shooting the sea lions and now I wish I’d taken the time to do it. I did think about it at the time but didn’t do it (it was cold and windy, I was parked a bit away from where I was shooting and the D3200 was in my Explorer, I would have had to put the quick release plate on the D3200, and I could probably come up with more excuses – such as I never seem to be as happy with the D3200 IQ in anything other than bright light).

In addition, one other thing that’s been on my mind lately, is that I’ve never tried my more expensive lenses on the D3200. I should see if the IQ is better on the D3200 if I use a better lens.

Tuesday, November 24, 2015

Ooops – wrong format – learn your Camera!

This last weekend I had a problem that I haven’t had for some time. I changed a setting on my camera without noticing it and ended up with less than optimum photographs.

View of Tucson from a viewpoint on lower Mt. Lemmon
I was up at the ski resort on Mt. Lemmon, just north of Tucson, Arizona. Who would think that there’s a ski resort there? But there is; located near the 9,159 foot summit, it claims to be the southernmost ski resort in the United States. And, there was some snow!

It was pretty chilly (by Phoenix standards anyway) with a gentle breeze. My Ford Explorer said about 37 degrees Fahrenheit. I got out of the car to reconnoiter the area for possible shots, taking my dog with me. I had him tucked inside my jacket and he was shivering. I found some shots I decided to take so I put him back in the car and grabbed the camera which was already mounted on the tripod after taking a few shots at a viewpoint on the way up the mountain.

I set up and took my first shots. I had my Nikkor 16-35mm f/4 wide angle lens mounted to my Nikon D610.

Looking at the histogram, I really wanted to move the curve to the right, brightening it up. I was using an f/9 aperature and didn’t really want to open it up any more in order to try to keep as much depth of field (DOF) as possible. And, I was already shooting at 30 seconds.

I decided to increase the ISO. I always have the camera at ISO 100 and thought I’d bump it up to 400. On the D610 you have to push a button on the back of the camera and change the main command dial.

I was working in the dark and didn’t have a flashlight with me. I thought I pushed the correct button but nothing happened when I changed the dial. So naturally I pushed other buttons and changed the dial, observing through the view finder any changes. I finally got the correct button and dial combination and bumped up the exposure. I liked what I was seeing on the histogram.

It wasn’t until the following day when I imported the images and started processing them that I found out I had changed the format to JPEB FINE / SMALL. When I saw that the images were JPEG and only 3,008 x 2,008 pixels in Adobe Lightroom, I knew immediately what I’d done and that the images were not going to be able to be adjusted as much as if they were RAW format.

I hopped up from my chair and verified the setting on the camera. I also verified my sinking feeling and disappointment. The camera was indeed set on JPEG FINE / SMALL. I switched my mode dial from my U2 setting and back again to reset everything.

I’ve learned that I need to keep my skills a bit more polished. I was pretty sure the ISO button was the bottom button on the left side of the back of the D610, and it is. I must have hit the button above it at first and then, in my confusion, just started hunting and pecking instead of taking the time to know for sure what I was adjusting.

Looking north from Ski Valley on Mt. Lemmon
One of the 3 books I’ve got on the D610, probably the Thom Hogan book, said you should learn the camera so that you can adjust it in the dark. I worked on that because I seem to gravitate towards shooting at night. I’ve been pretty good. I think that in this case I had been using Live View a bit to try to focus, zooming in and out. This requires the use of two different buttons on the back of the camera (different than the ISO button).

The zoom in button, which is the one right above the ISO button, and which I’d been using with Live View, also doubles as the QUALity button, meaning that when I changed the command dial with that button pushed in I had changed the format to JPEG. Darn darn darn.

Don’t let this happen to you! You really should learn all of your cameras controls well enough to operate them blindfolded, especially if you are going to take night shots. This means you don’t need a flashlight. Flashlights ruin your night vision and if you’re shooting with other people nearby, a flashlight can ruin their shot or their night vision as well.

Wednesday, September 9, 2015

I'm a Happy Photographer!

I've been noticing these things for a while but my trip to Oregon and Washington last month really brought them to the forefront of my senses. So what else can I do but write about them!

Elmer and I at Chiricahua National Monument, Arizona
One of my initial goals of taking up photography as a hobby was to get outdoors instead of sitting at a computer all weekend. I normally work Monday through Friday as a software engineer, sitting at a computer all week with very little interruption.  For many years my weekends were filled writing and recording rock and roll songs (http://www.RandyMorter.com/music) which was mostly sitting at a computer as well. In 2013 I decided I had to make a change, and decided to take up landscape photography which would include camping and being away from a computer.

Over the last couple of years I have certainly achieved that goal. I’ve spent most of my weekends out taking pictures, and a lot of those, perhaps about half, have included camping or “moteling” (of which I prefer the camping unless the Arizona temperatures make it too warm to get a good night’s sleep!).

Some benefits I’ve reaped are that I’ve lost a few pounds, I’ve met some people, I’ve got some photographs that my wife wants hung on the walls, I’ve had a lot of alone time with my pup Elmer. But there have also been some benefits I hadn’t expected or dreamed of…

While driving along the Oregon coast on my vacation, especially when driving along roads I’d driven many times before, I found I was noticing things I had never taken the time to notice or appreciate. I can’t tell you how many times I’ve driven the coast from Coos Bay to Lincoln City when my wife and I lived in Coos Bay and drove up the coast to get our children for our weekends (from our ex-spouses). What I can tell you is that those trips were almost entirely done with the purpose of getting from point A to point B and back again without absorbing the scenery to any great extent. Note that some trips were made from Coos Bay to Interstate 5 and up to the Portland area but with the same lack of attention to the scenery.


Alongside the Coquille River, Oregon
On my vacation in August 2015, I found almost the opposite. I truly did not have much of a deadline for the days I was on the coast. I arrived in Coos Bay on Monday and did not have to be anywhere particular until that Friday when I had a high school reunion event. According to Google Maps, along the coast that is only 472 miles, taking about 10 hours. I didn’t think I’d have any problem covering that distance in 4 or 5 days.

I actually planned my first couple of days on the coast with short driving distances between my sleeping areas, and then the day that I would be driving into Washington was longer since I knew there wasn’t as much in southwest Washington that I thought would be photogenic (the roads are inland and mostly tree lined and I've driving that road a few times before). That meant on the Oregon coast I had about 100 miles or less to drive each day and all day to do it.

As I drove up the Oregon coast I found I was looking at the scenery with an eye towards looking for photogenic scenery. I had that thought in my head, but it also dawned on me how much beauty there was almost every mile of the drive. I wanted to stop and take pictures of everything! I felt like I had wasted all of my earlier drives along the highway by not soaking in the beauty as I blindly whizzed by, more concerned about making time than lifelong memories and appreciation of the Oregon coast.


Driftwood Beach Wayside, Oregon
I pulled off in a lot of waysides, rest stops, parks, etc.  Not as many as I would have liked to, but enough to fill up my travels so that I didn’t waste much time at a campground. The night after leaving Coos Bay (okay, actually Charleston), I didn’t get to the campground until after dark and I left at first light.
I looked at things from different angles and vantage points, driven by my desire to find a good photograph, but with the added result of noticing more about the various locations.

For example, at one place I found a cool stump with some great exposed roots. I was moving around the root system looking for angles that would help bring out the structure. By doing that I was noticing the structure in much more detail than if I’d been walking by it without any desire to take a photograph.

When I was at Oceanside and shooting the Three Arch Rocks at sunset, I found myself looking through the viewfinder, noticing things in the composition, and then looking around without the viewfinder to see how I might improve the shot. I was taking in much more detail than if I hadn’t been looking for something to include or exclude from the shot. I was noticing how the reflections were playing on the shore, where the sun was in relationship to the rocks, how I could walk out on the sandbar. If I’d been sitting in my car I wouldn’t have noticed those things.

Sunset at Seal Rock, Oregon
When I was at Seal Rock, again trying to shoot a sunset, I did the same things as at Oceanside. However, the sun just kind of fizzled out. But because I really wanted to try to get a good picture, I waited and watched as the sun completely set, watching as the beach turned from light to dark, as the sea gulls changed from white to black silhouettes flying against the orange sky. I saw the colors change in the pools of sea water on the beach in front of me. I noticed that it got a bit cooler after the sun went down. I noticed that there were very few other people left on the beach after it got dark.

The bottom line was that I NOTICED. I absorbed. I was involved. I was in the moments. I was a living part of the planet and conscious of it.

I was happy.

As I write this a few weeks afterwards, I find I have a longing to be back in a similar situation. It doesn’t really matter where I am, just somewhere besides behind a computer. I want to breathe in the smell, hear the sound, and see the sights of life on the planet. And just maybe, at some point, I’ll be able to get in touch with the planet enough to create some photographs that capture some of what I experience so that I can share it with others.

Monday, August 31, 2015

Marina at Charleston, Oregon

I stayed in Charleston, Oregon on Monday, August 3, 2015, which I wrote about in my blog entry "My 2015 Vacation, Part 5 of 7". On Tuesday morning I spent some time at the marina with the hopes of getting some good nautical pictures.

I did have my bag of lenses with me but ended up loading the 50mm f/1.8 prime and that was all I used. There were a few shots I took of the other side of the bay that could have possibly used a longer lens, and there were a few shots I took on a pier that could have used a wider lens. Overall, however, I really like the simplicity of the prime lens.


Charleston Visitor Center Parking Lot

If you end up like I did, at the marina after the sun was up and only the one chance for shooting, you are immediately giving up any golden hour light. In my case there was some haze. It was NOT a clear blue sky, especially as you looked into the sun.

Since the sky was almost gray I figured I'd be getting almost perfect conditions to do black and white processing, or near that anyway. I also didn't have to worry about composition as much from the standpoint of where the light source was. It was pretty even lighting all around, as though I had a lot of soft light sources everywhere!.

That light also reduced the need for a circular polarizer to get rid of reflections from the water surface.

Because I was there kind of early (I expect for the fishermen 7:30 AM or so wasn't early) there wasn't much traffic on the water itself which should help with reflections of boat rigging. It still wasn't mirror flat on the bay, however, so ripples did affect my reflection shots.

Coming from Phoenix, Arizona, I don't have much opportunity to shoot pictures in a working marina full of fishing vessels and sail boats. This was my first attempt and I sure hoped it would work out!

Early bird gets the shell fish
I took some pictures of the mud since the tide was out. I'm not sure how picturesque they are but I kind of like the reflections. This one to the right has reflections of the fish processing building along with the low tide flats and a seagull to boot. I tried working with various lines in the pictures too (all of them, not just the mud flats).

This picture to the right purposefully has a diagonal of the sea weed starting in the lower left corner and pointing to the upper right, while the reflection and waterline kind of come from the upper left and point to the lower right. I'm not sure how effective it is but it does seem like a pleasing composition to me even if the subject isn't the best.

What I might do differently is to try it without the gull in it and use a longer exposure with an ND filter in order to smooth out the water more. I like how you can see through the water just enough but still have the reflection of the building. I did use a polarizer on the lens the morning I took these but no additional ND filters.

Seaweed flowing under bridge
This image is of seaweed flowing in the steady current (the tide was still going out) under a bridge. Again I played with the angles of the lines, which was easy for this shot because there is no obvious up or down or correct angle.

I am not sure, however, that you can really tell there is a current flowing here. Nor am I sure this is a picture that would really appeal to anyone. Perhaps if there was a crab on the sandy bottom it would be more interesting but I didn't see anything stirring on the bottom at all. I'd love to have some comments about this pic!

I do like the colors and angles though. I did pump up the saturation in this pic.

Pillars of the Bay
Here's another abstract shot that I thought was interesting at the time. I like the ship's bow between the pillars as well as the pillars themselves. I tried different crops in Adobe Lightroom but just didn't come up with anything I preferred over the full shot.

In this I tried enhancing the gold colors to try to make it look like there was some golden hour lighting going on but I think the lack of long shadows as well as not getting enough gold makes it obvious this is just a daylight picture of nothing terribly remarkable.

I took these from the end of a pier next to the fish processing building. I also shot pictures across the bay and of the boat tied to the processor's pier as they offloaded their catch.

I like this shot of a couple of boats tied up, and I like it best in this black and white treatment. What I don't like is the amount of water. I could fix that with a different crop ratio but I tend to be wary of crops like 9x16 because you just don't easily find frames for a picture like that. They do tend to be okay if you're just displaying a picture on the web, however.

But this picture shows a nice way to take advantage of the gray sky, in my opinion. It almost looks hazy which I think would really set these pictures off. I also would like to have flatter water but taking a longer exposure here would be hard since the masts would move. One solution I would try if I get back there is to take a couple of different shots, one properly exposed with a quick shutter speed to freeze the position of the masts, and a second with a long exposure (and ND filters) to smooth the water.They could then be combined in Photoshop.

Galway Bay
This is a picture of the boat tied up to the processing pier. I think a wider lens would have helped here. I could not get the bow in the picture with the pier and it just looked weird. I took some pictures with more of the pier but they showed some of this boat but not enough. They looked like they should show as much of the boat as possible and that they were accidental pictures as opposed to pictures taken on purpose with the intent to be worthy of hanging on a wall.

I didn't bother changing the lens due to my other time constraints. This still leaves me with an uneasy feeling where I hate being rushed. On the other hand it makes me realize that in all of these locations there is reason for return visits and with each visit better pictures may be envisioned and captured.

I still like this picture as it is although I wish I had the full bow or superstructure. I got more of the bow in a landscape orientation but that cut off more of the superstructure. Like I said, this picture could have used my Nikkor 16-35mm f/4 lens. Or possibly a 35mm prime.

Galway Bay and Processor
Note that I did talk to the guys on the pier and asked if it was okay if I took pictures of the boat and the activities. They said it was. That removed my feeling of "stalker" and allowed me to feel comfortable about taking pictures. I hadn't done much of that in the past but this started my asking permission often on my trip. I also think it may be a way to generate some sales in the future. I can ask permission and give them a card to my SmugMug site where they can find the pictures of themselves and possibly buy a print, and they may see a print of something else they might like enough to buy!


Piling
This shot of a piling was also from the end of the pier. Another shot that might have benefited from the wider lens which would have allowed me to show the piling from the water to the top. As it is I have a floating piling. I do like it as a "scouting" shot - it would be great to go back and shoot this in the golden hour (probably sunset since at sunrise the sun would be behind the piling - this is looking basically south east from the pier).

I moved from the pier next to the bridge over to the nearest set of docks at the marina. There was a sign that said it was okay for the public to go down on the docks so I did! I figured I was a public dude!

I took some pics from the bank first and they're okay but I really wanted to be closer to the water. I really think these look best with the black and white processing from Lightroom. It hides the gray sky, making it seem like these were taken with this processing in mind.


Waiting for the Master
Once again, to be critical, I wish the lens had allowed me to get the entire corner of the dock on the right side. Composing that way with the 50mm resulted in the stern of the boat being too close to the left edge of the image.

Stepping back caused me to start showing the shore and bank at the bottom of the picture. My final choice was to cut off part of the doc. It seemed like the least of the worst. And nothing was going to get me the reflection of the full mast.

You may also notice a sliver of a piling on the left side of the image. My choice was to include it a bit or have more of a shot that was straight down the dock and ships bows. I liked lining up the sterns more because it gave more separation between the ships masts.

There were a lot of decisions in this composition. Regardless of the resulting shot, I was very pleased with myself for noticing all of the issues in the viewfinder and trying to manage the conflicting decisions. I don't profess to be a master yet but I am certainly attempting to notice composition issues in the viewfinder and to try to solve them before committing the image to the SD card!


Fisherman's Parking Lot
 
On the way to the docks I spotted these bikes and had to get a picture. I really like this picture with both bikes but didn't notice that I'd cut off the back tire of the pink bike until I'd left the scene. Even the tire on the front bike is closer to the edge of the frame than I like. I don't remember even seeing that when I shot the picture. I don't know if I was at the limit of space and lens. 

How many times do you see a boy and girl fisher-person bike tied up together on a pier? And I cut the tires off. Some shots only come around once and you need to be prepared to get them. The boy scout in me let me down.

Out on the docs I got a few different pictures.

I got some of various smaller items such as buoys, a cleat, and a crab pot. I like these with both the color and a black and white treatment. My plan is to print them as a set of three and frame them together in a collage frame, probably as 5x7 prints.

I like the way my other collections have turned out when I've done that in the past and I'm sure this will be no exception especially since I don't get pictures like this in Arizona.

I'll likely combine them with a large print of the sailboats and their reflections giving me a nice bit of wall art.

The trick for me with all of these shots was trying to find different subjects to enable me to have a collection of at least 3 images. There was more that I could have shot but I stopped after a few items because I was also taking some pics of the boats.

I took a few shots of bows of some rugged looking boats. But what I couldn't easily do down on the docks with the 50mm was get an entire boat in the shot. Again, in retrospect, I think the 16-35mm lens would have been a better choice.

In the end, I spent about an hour total at the marina. If it was sunrise or sunset I could have easily spent that much time again. I didn't exhaust the possibilities there, meaning I have to go back! Darn the bad luck!

Misty Anne Morning
.