A New Toy
Er, a new essential piece of photography equipment, that is. I posted a recent
blog about not needing anything for my photography addiction, but I guess I was wrong. I was watching Scott Kelby's "The Grid"
Holiday Gear Guide (Episode 260) (
https://www.youtube.com/watch?v=Sh_39bWAack&t=198s, about 27:50) while having dinner and he mentioned 1 or 2 things I think I must have. So, I got one of them...
Tether Tools Case Air - What it Is
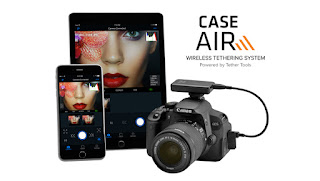 |
| Tether Tools Case Air |
The
Tether Tools Case Air is a wireless tethering device that attaches to your camera via the USB connection (not the "accessory connection" that my GPS connects to) and can mount on the hot shoe or external flash mount, as shown in their advertising photograph at right. They also provide a lanyard that allows you to hang it from the camera strap connection.
The Case Air transmits and receives data via its own WiFi, connecting to your devices that you likely already own such as a smart phone or tablet or desktop computer. They have free software called "Case Remote" for both
iOS and
Android smart phones, as well as for
PC and
Apple computers.
Tethering allows you to use software on your device of choice to view the live view image that the camera sees, adjust many of the camera settings including and especially the aperture, shutter speed, and ISO, focus, and you can press the shutter release and the image is uploaded to your device! That is too cool! It does not provide control over zooming, panning or tilting.
I know there are other solutions out there, but this device is only $159.99. There is the CamFi for about $100 and the CamRanger for about $300 and I haven't used either one. Scott Kelby got me interested in this unit and when I found out they're here in Phoenix, that made up my mind to try their unit.
Why I had to have it
Tethering is a very nice thing to have in a studio for a few reasons. You can control your device while it's on a somewhat fixed tripod. Because of the file upload, you can rapidly show your client the images or you can quickly import them into Lightroom. With wireless tethering you avoid having cables on the floor to trip over or that may come loose from the camera or remote device.
I don't do studio shooting though, I do mainly outdoor shooting.
One of my problems is when I want to have the camera down low, perhaps only a few inches off of the ground. I often have a hard time laying down and looking through the view finder or even the live view monitor. Part of it is because of age and the shape I'm in but another part is because of the rocks and prickly things there are on the ground in the desert areas that I tend to shoot photographs.
I've seen other options, such as the Nikon DR-5 Screw-In Right Angle Viewfinder for $200, or external monitors. But for a lower price, the Case Air also allows me to adjust focus and take the picture remotely. I can't wait to get out and try it!
Purchasing My Unit
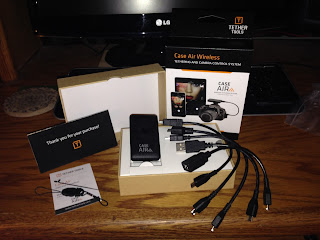 |
| My Case Air Wireless after unpacking |
I went to the Tether Tools company headquarters at 2202 E. McDowell Rd, Ste 5, Phoenix, AZ 85006 to shop for my copy. Josh brought one out that was hooked up and ready to go. Everyone there was very nice and helpful. This is not a paid ad for them, I just thought it was cool to meet their staff and get the unit from its birthplace.
When I got home, I first plugged the unit in to charge the battery, only to find out there was already sufficient charge to start using the device.
I plugged it in to my Nikon D610 and fired everything up per the instructions (I'd actually installed the software on my iPhone 5 the day before). When you start the system up it checks to see if a firmware update is required for the Case Air and it checks to see if an update is required for the remote device. In my case it let me know a firmware update was required so I installed it per the instructions.
Afterwards I needed to shut everything down and restart and then I was controlling my camera from my iPhone! Everything seems to work as advertised and I'm pretty happy so far. I'll wait until I get it out in the "wild" before saying much more about the performance.
It's nice to get a piece of gear that actually does what it advertises (most of my photo gear has been great that way). This actually surprised me a bit...
Surprise!
I had read a lot of the
downloadable manual but had glossed over the details about the bracketing, HDR, and focus stacking shooting.
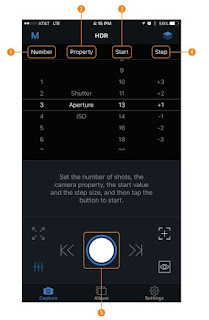 |
Case Remote Software
HDR Control Panel
from Tether Tools Manual |
I don't get the difference between the bracketing and HDR modes, except that with the HDR mode it will cause your camera to shoot up to 9 images where it changes aperture, shutter speed, or ISO between exposures. You get to choose which exposure aspect you want to change and by how much. The bracketing mode is similar but with only 3 shots. It seems redundant to me - I think the HDR feature should be called bracketing and the existing bracketing function is unnecessary.
But, my Nikon D610 only offers 3 shots and I've often wished I had more shots like the 5 on the D810. Now, with my Case Air, I've got up to 9! And, since I can control it remotely, I don't have to touch the camera in order to change things, for example if I wanted to shoot a burst of "HDR" shots by changing the shutter speed and then wanted to try another burst where the ISO changes. Surprise!
I don't have any functionality built in to my D610 to do focus stacking and I'm not aware of any camera that does. This is really cool and is another surprise! Again, you can select to shoot up to 9 images where the Case Remote software changes the focus between each shot. I've recently been discussing focus stacking with a fellow photographer (actually he's mainly a videographer) and this just seems really amazing.
Additional Notes
Another couple of things I noticed about the system are:
- The software doesn't work well when the D610 is in a "user" mode (U1 or U2). I couldn't control the camera until I switched to the "manual" mode (M), which is basically the same as a user mode.
- That's okay because you can store a lot of camera settings in the Case Remote software including auto focus settings, and you can name and load settings in Case Remote. That means you could save some settings for wildlife vs. landscape.
- The software does not upload RAW files to iOS devices (Josh informed me of that). That means you can't zoom in on an actual image UNLESS you shoot it as JPEG (or in my case RAW + JPEG at a minimum). That sounded like a drawback until I noticed you can flip between shooting RAW and JPEG format quickly on the Case Remote software - you can change to JPEG, shoot an image, upload and inspect, adjust and repeat as necessary, then switch to RAW to take your "real" file. And, if desired, you can delete all of those JPEG files from the Case Remote software! That is convenient!
One final note - I also installed the Android software on my Samsung Galaxy Tab 4 tablet that I use with my DJI Phantom 3 Advanced. The software installed and worked fine on it too but there are differences. The iOS version has more controls available and the layout is a bit different. However, the Tab 4 has a much bigger screen than the iPhone 5 and it allows you to upload RAW files (not that you can do anything with them once they're on the Tab 4). I just wanted to mention that the software works well on those 2 devices. I haven't tried it on my PC yet.