Tuesday, February 25, 2014

More Equipment Challenges - a Ball Head

My tripod and ball head adventure


After some online research, I purchased a Manfrotto 055XPROB tripod along with a Giottos MH1001-652 Medium Ball Head with Tension Control and MH652 Quick Release on 1/16/2014. I believe I've already written about this a bit.

There are compromises with the tripod. There are other brands. There are other features on other tripods. I decided to get the Manfrotto 055XPROB because of:
  • Apparent reputation of Manfrotto (I've never had any Manfrotto gear so I can only go by what I read and there are lots of positive things said about Manfrotto gear).
  • A positionable center column and legs. I want to be able to position the camera low to the ground for macro shots.
  • The height of the legs without the column extended - it provides a more solid mount at eye level or close to it. With the column extended on shorter legs the mount is not as solid.
  • Three leg sections (instead of four). Again, this means fewer areas that allow flexing to occur and the material is overall thicker. This also contributes to a more sturdy mount
As I may have mentioned elsewhere, the trade off for this model with respect to the Manfrotto 055CXPRO3 carbon fiber model includes:
  • The carbon fiber version is lighter which makes it more pleasant to carry for much distance. Since I don't expect to be hiking very far with a tripod it wasn't a big factor to me. The downside of the lighter tripod is that it's more susceptible to vibration due to wind.
  • The carbon fiber version is actually more rigid which causes a more stable camera mount.
  • The carbon fiber version is more than twice the cost of the aluminum version. I couldn't justify the difference. Today, the version I got is listed at $169.95 on Amazon and the carbon fiber version is listed at $399.99.
I have only been able to use the tripod a limited amount but I know I like it. It's a keeper. It meets what I want it to do and I have no questions or doubts about it other than possibly I might want a lighter version in the future if I start hiking farther. But based on my likeliness to extend my hiking excursions, I'm not expecting to regret this choice any time soon. And, if or when I do, I'll get another tripod and still keep this one. It's mine!

Out with the (not so) old


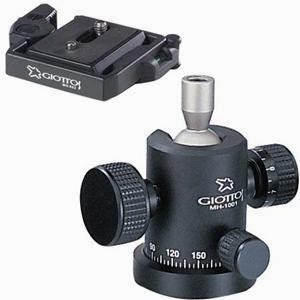
The Giottos ball head is, or was, another matter.

I really liked the price, fit, finish, and features of this unit. It's supposed to support 11 pounds.

Unforutunately, when I had my Nikon D3200 and AF-S DX NIKKOR 55-300mm f/4.5-5.6G ED VR lens, which combined weigh just a couple of ounces over 2 pounds, I experienced significant "droop".

Droop happens when you compose a picture, tighten the ball, and then the camera droops when you let go of it. I did not like that. When you loosen the ball again the whole image may need to be re-composed, even if you have the friction control tightened down (the friction control adds "grip" to the ball so that even when the main "lock" is loosened the ball won't just flop around, preventing the camera from falling over and hitting the tripod).

Once again, I resorted to the web to read how others deal with this issue. Note that I'd read reviews on this head, I'd seen some users complain about droop, but I'd seen other people complain about droop to some extent on most other ball heads. Also note that this is a small head and fairly inexpensive but got good reviews.

The only real solution to combat this on an existing head is to adjust your composition accordingly - aim high and assume the droop will occur and hope that when the drooping ends your shot is composed the way you want it.

If it weren't for the fact that my $79 or so Velbon all-in-one tripod with plastic pan & tilt head had zero droop, I might have accepted the Giottos. But, I did have the cheap Velbon and liked how it stayed where I set it when I tightened it down and let go of the camera.

I decided I couldn't keep the unit. I needed either, as a minimum, to try a larger Giottos, or I needed to get a different brand. I'd bought the head from Amazon and the time was running out for returning it, so I sent it back.

Yay Amazon!


I'd never returned anything to Amazon before. It was extremely simple and very quick. I am a big Amazon fan and a Prime member.

The Replacement


After more research and deliberation and almost stumbled on my new ball head. I didn't see it mentioned in any comparisons. I barely saw mention of it anywhere but I'm glad I found out about it. I'm talking about my new Manfrotto 468MGRC5 Hydrostatic Ball Head with RC5 Rapid Connect System (3433PL)

I ordered this from Amazon. It was actually provided by Adorama and I checked - it was cheaper to by from Adorama through Amazon in this case.

This unit is built like a tank. I chose the longer Arca-Swiss type plate thinking it may work better when I (eventually) get my copy of the new Tamron 600mm lens. For my existing camera and lens the RC3 plate would probably have been sufficient (and I may get that plate).

The big thing with this ball head is that it's hydraulic. I haven't seen a cut-away diagram of how it works exactly but I assume that there's a chamber of hydraulic fluid that forces a wedge around the bottom of the ball to lock it in place. The Giottos web shows a cut-away of how their system works and I can't help but believe this design is better.

Regardless of how accurate my beliefs are, what I know is that when this unit is locked the mount or ball do NOT move.

Besides that, which is enough to make me happy, it has a pan / lock and a friction adjustment. The pan degrees are etched into the base and are easily visible (the Giottos knob for the pan release blocks the degree markers, as do some of the other Manfrotto or other manufacturers or models). The thing appears to be out of solid metal.

There are two minor issues with this head that I'll live with or address:
  • It's heavy for a ball head, weighing in at 1.63 pounds. Along with my tripod legs, the system is 6.92 pounds. On the other hand, it won't blow away very easily!
  • The etched degree markers do not have even as much contrast as in the image above. I'm going to put some paint in the etchings.

Even more...

I also got myself the Manfrotto tripod sling to use when I'm on a shoot. I got the one that I can put over my shoulder and carry the tripod on my back. In addition, I got a carrying case that I store the tripod in when travelling or when it's just waiting in my room for another picture taking trip!


Sunday, February 23, 2014

How does all this stuff work?

Once upon a time...

Years ago, I did a bit of serious video work in the past, working for a video production company that mainly did commercial product videos using broadcast level camera and tape systems. The company also did some videos for ballet, motocross racing, and nature videos. I mention this because I gained experience in composition, focus, white balance, editing, and more. I understood, or at least had exposure to, some of the terminology and technology used in digital photography.

But I hadn't manually controlled exposure before - most of the video shooting was using automatic settings, sometimes with manual focus. The DSLR presented some new opportunities and challenges.

My wife suggested I take a camera class and I considered it, but so far I haven't done it. I've found the web contains a vast amount of free information on photography and I avail myself of a lot of it. I have also found some co-workers / friends that have experience in photography, one of them has done photography since the 1970's and owned a photography related business for 10 years.

In addition to the manuals that came with my camera and equipment, I've also purchased AND READ a few books on photography which have helped immensely.
I'm certainly no expert on photography but I have learned a few things in the past few months and thought I'd share the trail of my progress so far.

Baby steps


Before I even got my camera I was reading about taking pictures. I knew I wanted to do a few things that I couldn't with my point and shoot Kodak. I wanted to take pictures of moving water like creeks where they were "silky" - which required controlling the shutter speed. I wanted to take pictures where part of it was in focus but other parts weren't, like a blurry background - which required controlling the aperture. I wanted to take pictures where there was a large contrast range. I wanted better color and sharper pictures. Basically, all this meant I needed a camera with full manual control of the settings.

In my wadings of the internet, one book was mentioned a number of times as a good source of information on the technical aspects of exposure: Understanding Exposure, 3rd Edition by Bryan PetersonSo, I bought it.

I got this early in my adventure and I learned a lot from it. It inspired me to shoot some of the pictures I've shot since and that I've got a lot of comments on. I recommend this book for someone starting out as well as for someone who wants a bit of inspiration if they're not getting it anywhere else.

I like Understanding Exposure because it doesn't have a lot of silly attempts at jokes nor condescending language. I like the way the material is presented; it doesn't have a lot of mentioning something only to ask you to jump to a different page to understand it. The content is presented linearly but in logical sections in each chapter. You can read chapters out of order if desired but there is enough building upon the previous chapters that, for first time readers anyway, it seems better to me to read the book in order, from start to finish.

When I finished the book I was actually wishing for more. But I think it really covers the basics of exposure and includes some additional information such as on HDR.

After reading the book you should have a good realization that, for getting an image recorded properly, there are really only three things to worry about: the f-stop or aperture, the shutter speed, and the ISO. Beyond that are focus, composition, lighting, etc. But the basics of taking a picture are those three things, the triangle or tripod for a good image capture. You need to get all three of those settings working in harmony, or at least to the extent that they cause the sensor to capture your vision of a good image!

Besides that book I got a number of old film photography books that I enjoyed. They talked about things that are available in image processing software such as dodging and burning which I had a hard time finding information about online, or at least that I understood. I got a good history of cameras and more information about depth of field. The books are probably none that are available anywhere so I'm not going to mention their names here.

Software Books


I also got some books related to the software I have:

Real World Nikon Capture NX 2 by Ben Long

Photoshop Elements 12 For Dummies

Photoshop Elements 12: The Missing Manual
Adobe Photoshop CC for Photographers

Although the software has help of some form (online or locally on your computer), I like the books better. The two Photoshop Elements 12 are Kindle versions; the other two are hard copy. These books have some information about picture taking, if you read between the lines, but they're almost exclusively geared towards using the software.

Magazines


I also want to mention that I subscribe to Outdoor Photographer magazine. For what I want to shoot, it has a lot of good information. I have the Kindle version which is cool. I can take the mag and the Kindle books with me on the Kindle when I'm camping. (I also have the extended Nikon user guide on my Kindle).

Where I'm at now


I've got a lot of insight out of the books that I wouldn't have gotten simply by poking around. I've actually re-read a good portion of all of them. If you're still young and can read, assimilate, and retain information easily from web sources, there is definitely information out there. However, by reading the books I get exposed to things I wouldn't have even known how to ask Google about so for me, and old school type of dude, the books are great.

The next step


Now I'm looking for material to help me expand artistically. That seems to be where I lack the most. Not that I've got all the exposure stuff down (as I was reminded in my recent Chiricahua excursion), but I understand (sort of) what I do wrong there and how to fix it (at least in theory). What I don't see as much as I wished I did was how to find something interesting in almost everything I could take a picture of. Sure, a flower might be pretty or colorful, but how can you frame it in the camera in a new or unique way in order to make someone else HAVE to look at it or HAVE to comment on it? That's what I want to do next.

Thursday, February 20, 2014

Photo Editing Software

Taking a pictures doesn't end when the shutter closes

One thing I hadn't thought a lot about prior to getting my camera was that, because the images are digital, you need some way to get them into your computer and then on to whatever you are going to do with them - look at them on your computer, post or email them, or print them. And, printing can be done on your own printer or by sending the off somewhere else.

I got interested in taking pictures (as I mentioned in an earlier post) after a short trip when I took some pictures with my Kodak camera. I posted some of them on Facebook and enjoyed the responses I got. I also enjoyed the process of taking the pictures, looking for what I thought was a good composition, trying to get dramatic shots of the depth of Canyon de Chelley, close up shots of lizards and birds flying. I enjoyed (and still do) the memory and experience of being there when I took the pictures. I like that looking at those pics reminds me of what my dog and I were doing - how bored my dog probably was and how I enjoyed the solitude of being alone with my dog and taking pictures of some amazing sights.

After seeing those pictures, I wanted them to be sharper. I also wanted to be able to do things like create "silky" water, blurring backgrounds, etc. Mainly so I could share them on Facebook too.

But once you have the camera and have taken some pictures you need to be able to transfer them to your computer, and then to be able to process them suitably for uploading to the web.

Enter the software and computer interface...

More money to spend and decisions to make


Most cameras probably come with some sort of software that enables you to upload your pictures from your camera to your computer. My Nikon D3200, for example, comes with "ViewNX 2" (actually, it may only be available as a download - I don't remember. I know it IS available as a download but I don't remember if I got a CD with the camera).

Disclaimer: I'm using a Windows based PC so I'm only going to discuss that computer from this point forward; I have very little Apple experience. I'll try to remember to use uppercase for things like RAW and JPEG but if I don't, well, excuse me. I'm also NOT going into the technical details of what RAW or NEF are - I'm just writing about my opinions regarding my image processing software adventures.

The Nikon "ViewNX 2" software is free. It includes a separate application called "Nikon Transfer 2" which provides the means to transfer the images from the camera to the PC. This works with either an SD card reader or by hooking the camera up to the PC through a USB connection. It provides some cool features like folder/file renaming and copying the files to 2 locations at the same time so you have your "working" location plus a backup.

"ViewNX 2" provides some basic editing capabilities and works on RAW or JPEG format files. It can do cropping and resizing. It allows you to edit some of the EXIF data including GPS info. It's not bad for what it does and it's price is good: FREE.

However, once you start reading stuff about photography on the interweb such as trick photography, composition photography, adding a watermark, adjusting parts of an image while leaving other parts untouched (or touched up differently), you realize that "ViewNX 2" doesn't provide the tools required for that. In fact, one thing that I find is a huge omission in "ViewNX 2" is the lack of noise reduction control. There isn't any noise reduction at all, not even when doing a JPEG conversion.

So if "ViewNX 2" (or the equivalent Canon or Sony or Pentax or ???) sofware isn't enough what should one get?

A quick bit of research will divulge that the most popular software is from Adobe. The professionals use Adobe. And by pros, I mean people who edit images and have them published in top magazines like National Geographic. In addition, for Nikon users, you'll hear about the Nikon "CaptureNX 2" software. I'm going to just discuss these options - not because I'm a snob, but because that's what I ended up getting.

Layers or not


First, I discovered that there are basically 2 types of image processing which I'll call "pure" and "enhanced".

I think of "pure" image processing as processing where all you're doing is enhancing the image captured by the camera. This is what Nikon's "CaptureNX 2" provides.

It allows you to do things like increase the sharpness, contrast, brightness, hue, white balance, exposure compensation, noise reduction, etc. It allows you to perform edits on selected portions of an image. It provides the ability to create and save presets and to do batch operations (such as applying a preset to a number of images).

If you read enough you'll also find that "CaptureNX 2" has a reputation for processing Nikon RAW files better than any other software. That was what sold me.

My goal soon became trying to get the sharpest pictures I could, to compare with those that I saw on various sites such as Flickr.

I like "CaptureNX 2" a lot. It integrates well with "ViewNX 2" and "Transfer 2". And yes, you really need all 3 (well, if you're using "CaptureNX 2" you will likely find it easier to use all 3).

The way my system works, I have a SD card reader on my PC. I pull the SD card out of the D3200, put it in my PC, and "Transfer 2" automatically opens. I use it to rename and copy the files into folders on my hard drive as well as an external hard drive for backup. When the files have been transferred it automatically opens up "ViewNX 2" so that I can start working with the images on my PC.

"ViewNX 2" provides a browser with image thumbnails, even when the files are RAW files. Windows 7 doesn't have the capability to show a thumbnail of my Nikon .NEF files. I can scroll through the images and view a larger version of selected images. When I want to edit a file I can directly open the selected image in "CaptureNX 2" from "ViewNX 2". "ViewNX 2" will be updated with any changes I've made in "CaptureNX 2".

This process is great if all I want to do is make the picture look the best that it can. But if you get interested in other types of photography such as composite images, or if you want to add a watermark, "CaptureNX 2" doesn't provide any functionality for doing that. Enter the Adobe options...

I think of "enhanced" image processing as the processes or ability to modify the picture to the extent that it is NOT what the camera saw or in some cases, is even capable of seeing. This includes composite photographs for example, where you might use the sky from one picture and the foreground from another picture and a person from a third picture. This process is often called "photoshopping" and that's what Adobe offers - "Photoshop" (among others).

To do any thing like combining parts from different pictures into one picture, or even adding a watermark, is what "layers" provide. Basically you have different layers which can be portions of an image, such as having one layer with nothing but a sky shot, another layer with a foreground, and another with your significant other, for example. Then you can blend them, move them, etc.

Adobe has 3 main photography processing software packages. The grandpa is "Photoshop", the baby is "Photoshop Elements", and somewhere in between is "Lightroom". This is somewhat confusing, at least it confused me for a while.


Between the 3, Photoshop and Photoshop Elements offer layers. If you want to do composites or trick photography (such as levitation like in my avatar) you need layers. Lightroom is more comparable to Nikon CaptureNX 2 - it's more geared to "pure" image processing. However, Lightroom does allow you to add a watermark - either an image or text, which is something I wish CaptureNX 2 had. I don't care if CaptureNX 2 has full layer support, but at least it should allow me to put a watermark on the image (my only other complaint about CaptureNX 2 is that I wish you could re-arrange the edits like you can re-arrange layers in Photoshop or Photoshop Elements).

Because I'm cheap, I started out with Photoshop Elements, version 12. I wanted to try some levitation which requires layers.

I got Photoshop Elements 12 (PSE) in October, 2013. On a side note, my photographer co-worker / friend / guru, Jon, had just got PSE in August or so, but it was version 11. Apparently PSE has updates released each year. The upgrade is almost as expensive as purchasing the new version. If you're thinking of getting PSE for the first time and it's August or September you might want to wait until the next version is available.

The new version of Photoshop and Lightroom are available as "cloud" software. The versions are called "CC" for "creative cloud". You pay a monthly fee to Adobe. In return you can download the software which apparently only works while your subscription is in effect.

Because I registered the software and elected to receive updates or other notices from Adobe, I got an email that offered a year of "CC" for $9.95 or so per month and gave me both Photoshop CC and Lightroom CC, as well as the Adobe Bridge software (which is the equivalent of Nikon Transfer 2). How could I refuse?

So I've actually got some experience with Adobe Photoshop, Lightroom, and Photoshope Elements 12.

I don't have any favorites regarding functionality; they're all a bit different.

What I do like are the following items:
  • Photoshop works with 16 bit files (and even 32 bit files if you have them). The camera shoots at 12 bits (my camera). Photoshop Elements only works with 8 bit files, loosing some info. Photoshop has more features than Photoshop Elements, but not a lot.
  • Photoshop Elements is installed on my PC and I own it. I don't have to make a monthly payment. Once my CC subscription runs out I don't know what the monthly fee will be and/or whether I'll want to pay it. I don't have to worry about that with Elements. I like some of the "short cut" processing available - in Photoshop you have to do more things manually.
  • The only thing I really have used Lightroom for is its watermark functionality. It will place a watermark on an image and it will resize it too (e.g. if you want it to be 10% of the height of the image it will do each picture for you).
Basically, I end up using Photoshop more than PSE now, and rarely use Lightroom. But that's for my type of images. I can see how Lightroom would be good if you're processing a lot of similar pictures such as a wedding or portrait session. My landscape or other images are not parts of a large group of the same thing - they're all pretty much one-off's. And, I can do the bulk processing in CaptureNX 2 if I want, with the exception of the watermark.

Note that CaptureNX 2 will also save images as 16 bit TIFFs.

And one more thing


Along the way I also got interested in HDR images. This requires either a camera that process HDR images internally or software that processes HDR images. I read about some of the different offerings out there, but my informant Tony Northrup steered me to Photomatix and I got their "Photomatix Essentials" version. I have fun with it too. Note that Photoshop and Photoshop Elements do HDR also, but not the same as the Photomatix software.

My PC system

My PC is set up with 8G of RAM, a quad AMD processor, and about 2.5TB of disk space. It seems fast enough to run my Photoshop, Lightroom, Photoshop Elements 12, ViewNX 2, CaptureNX 2, and Photomatix Essentials software, often with more than one of the software applications open at the same time and often with multiple images open including panoramics or 16 bit TIFFs.

The shutter closed, hopefully my wallet has too!

Those were my software choices, and I do use them all, although I barely use Lightroom. Between all of them, it cost roughly $368 for that software. In addition I've purchased or received a few books about using the software, totalling roughly another $88 (some were used books, some were e-books). So in addition to the camera I've racked up another $450 in software and related books.

Tuesday, February 18, 2014

Get out and shoot some pics!

Getting Out


I took a quick trip to the Chiricahua National Monument in Arizona this last weekend to visit the impressive rock formations and to try to take some equally amazing pictures. It's roughly 500  miles round trip from my home in Phoenix, about a 4 hour drive each way.

I haven't been out shooting landscapes for a while (a few months), which, coupled with my general newbiness to photography, resulted in less than stellar results overall. I did get some good pics. But out of the 450 or so I shot, more of them had problems of one type or another than didn't. As I told my co-worker friend who's been a photographer since the 1970's, I learned I have more to learn.

On the other hand, I felt good that I noticed some of the issues. It gives me something to work on. Here are some of the things I had difficulties with, in no particular order:


Blown out skies

I was actually causing this problem somewhat on purpose. I have been wanting to push the ISO to see what the results were for different ISO settings. I read about others that use my same camera, and some using other cameras, that get great results with ISO settings of 800 or even higher. I wanted to see how I could push it.

The problem with that is that it seems like the rest of the exposure settings get more sensitive. I tried shots with smaller apertures or faster shutters but it seems like I always blew out the sky. It was a pretty blue sky, too.

Along with my experiments, some of the more interesting shots are in a narrow canyon that basically runs east-west, causing a large brightness dynamic range (measured in Exposure Values - http://en.wikipedia.org/wiki/Exposure_value) if you shot the top of a cliff along with the interior of the canyon. In other words, the camera can only reproduce a certain brightness variation but this bright cliff top to dark canyon can exceed that range. Those shots are difficult themselves without playing around with different ISO's on top of it.

I ended up getting a lot of pictures where the sky looks white.

So, I learned a few things due to my pictures with blown out skies...

A.  I may look into getting a graduated neutral density filter (GNDF) (or a set). I have some non-graduated NDFs but I really could have used the GNDFs. That just means both more expense AND more crap to carry. But if it gets the shot, that may be the ticket.

B.  I didn't take the time to do it, but the canyon shots are perfect for HDR shots. I'm going to try this in the future.

C.  This was something of a breakthrough for me. In the past I've noticed pictures that I've done post processing on where the trees or other items that are on the horizon of a hill where I've adjusted the sky behind them end up with a blue cast to them that I just don't like. They look too artificial for me, and I tend to bump up the saturation a lot in my pics. I found out that when I adjust the blown out sky in pics, the objects along the top of hills such as trees where the sky is visible through the object end up turning blue along with the sky.

I'd never understood where this blue cast was coming from and now I do. This led me to two more observations - try to get a better sky captured in the camera, and if you do end up turning the objects bluish you can also re-correct the color of those objects. The subsequent color correction on the objects still isn't great but it's better. The bottom line is, get the best picture you can in the camera. Post processing can only do so much.

Pay more attention to the distractors

I constantly try to make sure that my composition has as few items as possible to distract from whatever it is I think is the main subject. But with the small view finder some of those things don't show up until the image is blown up, sometimes even bigger than the LCD on the back of the camera.

Sometimes, though, you can't do much about the issues.

I shot some sunrise pictures and while I like them quite a bit, the location I was at had barbed wire around the field that was between me and the sunrise. It doesn't end up showing up much in the pics because the foreground is so dark but I wish I could have got to the other side of the fence. I might have been able to squeeze between the strands but I know from experience that there are a lot of tarantulas in the area and I just didn't want to deal with running into one in the dark alone and in the middle of nowhere. I hate spiders. I have arachnaphobia. Always have.

Another issue with my camera is that the viewfinder has 95% coverage. That means it's not showing me what's going on for the whole frame. Now that's kind of okay because if I compose okay in the viewfinder that means that it could at least be cropped to the picture I see.

However, when you crop you're cutting off pixels from the image. My sensor has 24MP. But if I cut off 5%, that's 1.2MP. Not a huge amount or percentage, but why should I loose any pixels due to garbage I let into the picture?

I shot one pic where the corner of a garbage can is in the pic. Fortunately I saw that on the LCD playback so I zoomed in slightly (or panned - I don't remember) and took another shot where the garbage can wasn't in the picture at all. I got to keep all my pixels!

I shot some pictures of plaques for or about Rex Allen in Willcox, AZ. I didn't used to do this, but this time I noticed some leaves and other debris on the plaques (they were in the sidewalk). I picked the debris out of the plaques before shooting the pictures. Actually, I picked some out and blew some out by my mouth. People around me looked at me like I was strange, but I didn't care. I wanted the shot without the crap in it.

I just don't really worry about what others might think about me when I'm shooting. I think I got that way in the past when shooting video. You are kind of a stand out in a crowd AT FIRST. But if you just go about your job people quickly ignore you as if you were any other fixture in the area. That actually helps because before you know it you can get candid shots of people if you want. They forget that you're there and they don't pay attention to what you're doing.

Preparation

I stayed in a motel prior to going up to the Chiricahuas. I spent my time posting some of the pics from Willcox on Facebook and messaging my wife on Facebook. I thought it was cool - I'd never done that on the road before. I shoot RAW in the camera. I can actually do a JPEG conversion in the camera of RAW shots stored on the memory card. Then I can use a RAVPOWER SD Card reader and Wi-Fi hotspot to transfer the JPEGs to my Kindle. From the Kindle I was able to upload to Facebook via the free Wi-Fi and internet connection in the motel. Cool!

Then I went to sleep.

What I SHOULD have done was make sure my lenses and filters were clean. During post processing I noticed that my small lens has a lot of dust on it. Or the filters do; I'm not sure which.

It got me thinking about the picture taking work flow.

At some time before the shoot you need to plan the shoot to some extent if possible. I had looked at maps of the Chiricahuas and knew that the main observation points are basically north of the rocks. In the summer there might be some cool shots with the sun coming in at a low angle from north of the formations but in February I wasn't expecting that the golden hours would do much. I could be wrong, and didn't actually see the sunrise or sunset at the main observation points, but based on the orientation to the sun I don't think it'd make that much difference (except perhaps for the color).

I knew the main road through the park runs east-west in the canyon so that would be questionable too, especially since the sunrise would probably occur south of the slot of the canyon.

Knowing something about where you're going to shoot can pay some dividends instead of everything being a surprise when you get there.

The equipment should be inspected and maintained prior to needing it. In my case I should have gone through the lenses, filters, etc. I did top off my batteries but that was about it. I knew where everything was packed in my cases, etc. But I should have cleaned my lenses.

I'm thinking it would be good to clean them after a trip too, and I may try to add that in to the work flow. However, when I get home from shooting my main focus is trying to get the pictures onto the computer and to start processing them. I think I'll leave that activity for that time frame. If I do feel like cleaning the camera at that point I may do it.

Batteries should be fully charged. Memory cards should be formatted. Ensure the tripod is clean and working (lube it if necessary). Make sure you have all your stuff and then double check.

The more times you get out the more it becomes second nature to check your gear. I half expect I'll forget something every time. But you still need to take the pictures that you can with what you have with you.

Well, those are some of the things I learned on this last excursion. I also learned that it's fun and rewarding and that's the most important thing. I was blessed to witness a great sunrise and got a cool picture or two - but with the sight that was presented it would have been hard not to! Most of all - I got out and took some pictures!


Friday, February 14, 2014

Keep it coming

I want more

Besides the Camera you need other stuff When I got my D3200, I got a "bundle" with it that included an SD card, an instructional DVD, and a camera bag. There may have been another thing or two as well. The reason I don't remember is because with the exception of the SD card I really didn't need the other things and don't use them. It wasn't money well spent. In fact, for the extra $40 or so I could have got a faster SD card and I would have been better off. My lesson learned here, and one that I've learned in my music equipment purchases but failed to apply to photography purchases in the excitement of the moment, is to NOT buy anything until and/or unless you're sure you need it.

I knew I'd need a camera bag or case of some sort, as well as a memory card, but I ended up with less than stellar units by purchasing the bundle. The camera bag held the camera and lens and maybe a few other items, but as I found out later, it wasn't big enough for everything. At this point, I have a different camera bag that I mostly like. I got the AmazonBasics DSLR Backpack and think it is a very good backpack type of camera bag, and an excellent value compared to other bags.

However, now I wish I had a different case solution. I don't use the backpack bag as a backpack. Now I prefer to use a small waist bag to carry one extra lens, a spare battery, memory cards, cleaning gear, and some other small things like a strap for my eyeglasses and an infra-red remote shutter release.

I carry the camera on a sling type strap (for hand held shooting) or on my tripod (I know, it's risky). I have a separate pouch I use to carry a few filters (polarizer and a couple of ND's for each lens - they're different sizes).

What I want now is more of a suitcase style case to carry my camera gear in the car. When I get somewhere that I'm going to take pictures I'll load up what I want into my waist bag and go shoot. When I'm shooting, if I need something that I don't have with me, I'll have to go back to the car but I won't be carrying my whole collection of supplies every step of the way.

My backpack holds most of my stuff, but not all, and it has the straps, etc., necessary or desirable for a backpack, but I don't use them and they get in the way. I didn't spend a lot of money on the backpack bag (it's currently less than $30) so I'm not out a lot, but between the bundle and this bag, I'm out maybe $70 for stuff I don't use. And I'm sure that's not everything I've lost money on...

My failing memory


The SD card I got in the bundle was a 16G SanDisk Ultra. At the time I didn't even know that SD cards have different speed ratings or that it was important. It is important - if you do burst shots or perhaps video. Now I have a 32G Extreme and plan to get another, faster card.

When I got my camera they had a special going on lenses. I could add a 55-200mm zoom for $150, a savings of $100. They also offered a similar deal on their 55-300mm lens but I don't remember the details. Even though I thought I'd try to keep the camera purchase at about $500, I was pretty sure I'd want a longer lens so I added it to my purchase. Fast forward from August to November or so. I'd tried shooting animals at a local wildlife park. I found that the 200mm lens was NOT good enough for that, even with animals in cages they were far enough away that I could not fill the frame with the animal, and it was hard to see details through the view finder when the animal was so small (like, were their eyes open?). So I started looking for a longer lens.

I ended up getting the 55-300mm lens that I passed on when I got the camera. In addition, since the new lens covered the full range of the 55-200mm lens, that 200mm lens was not useful. But if I sold the 200mm lens I'd get maybe $60 or so (Adorama sells that lens used for about $110).

I decided to just keep the 200mm, at least for now. If I drop the 300mm at least I'll have some level of back up. But now I'm actually looking for an even longer lens.

I took pictures this last weekend of some wildlife and again faced the problem that my 300mm lens was not long enough. But, what I'm going to look for is something with a longer minimum length. Nikon has a lens in the 200mm to 400mm range, so at least if I can get something like that it won't completely duplicate the range of my other lenses.

There are lots of goodies you can get to go with your camera and I've only touched on a few. I'm constantly re-learning my own advice: wait until you really need something before you get it. When you decide you need something, research it. Again, I recommend the Tony Northrup book on buying equipment, at least as a good source of info to go along with any other research you do (it's only $10 or less and can save you a lot of other money).

I already knew I was really interested in landscape photography. The other things I've shot pictures of have been inspired by seeing other people's pictures or reading books (e.g. levitation pictures). But I still don't really do portraits of people, pets, or ???. Consequently I don't have a lot of money in backdrops, lighting, or other props. All of my purchases since I bought my camera have been because I had a need for the item. That doesn't mean all of them have worked out, but it does mean that I haven't regreted any of them!

Thursday, February 6, 2014

The After Party

See some of my pics on flickr at: http://www.flickr.com/photos/randymorter/


The State of My Thingies


I bought a Nikon D3200 in August of 2013. According to Nikon or other sources, it was their best entry level DSLR up to that point. It was released for sale in April of 2012. It got good reviews, in fact, it got slightly better reviews than the D5100 due to the bigger sensor and other specifications and real-world results. The D5100, which had been released in April 2011, had some advantages such as the articulating LCD.

Keeping with my original plan of getting a good functioning unit without committing top dollar, I chose the D3200.

Now, in February 2014, the D5100 has been replaced by the D5200 (in January 2014, roughly a 3 year cycle). A D3300 is planned for release this month (it looks like it's still in pre-order status right now at Best Buy), roughly a 2 year cycle.

That brand new shiny DSLR, at least if it's a Nikon, will be old news within a couple of years or so. Kind of like Microsoft operating systems, they go out of style because the manufacturer releases a new version every so often. But, the camera will likely still work regardless of whether it's been replaced.
 

The Party's Over


As for me, after having my camera for about 6 months, I'm looking at my next camera. So I'm kind of going through the process again of looking for my next DSLR.

This time, though, I have a bit more experience. I'm not looking for a new camera just for the sake of having a new one, it's because I know what I want that the D3200 doesn't have. Things I was aware of when I got the D3200 but things I didn't know whether I'd want them or how valuable they'd be to me.

I'm not looking to get rid of my D3200 either.

After shooting as much as I have (and I'm not implying that it's a lot, just that I've shot enough to know what I wish I had that I don't), I know I don't like changing lenses outdoors in the desert where I live (Arizona). The dust is not my friend and it's everywhere. I want to be able to have a short lens and a long lens ready, each on their own body. By getting a second camera body I will accomplish that.

I like playing with HDR (High Dynamic Range) photography, using either Photomatix or Photoshop. I really WANT automatic exposure bracketing.

I want mirror lock up, depth of field preview, user settings, a bigger buffer and faster burst mode. I want more buttons so I don't have to wade through menus.

I don't care at all about movie mode or high ISO. I'd just as soon NOT have the movie mode (although I did use it recently to shoot some laughing hyenas that wouldn't have had the same impact if all I had was still shots).

I really want to get a better image quality (IQ).

My D3200 doesn't answer my want list. So, I've started researching my next camera body. I'm still most likely to stay with Nikon or Canon.

I haven't looked into Canon much yet, but since I haven't got a lot invested in the Nikon, I am looking into Canon. I just haven't got an opinion regarding that yet.

As for Nikon, after researching as much as possible on the interweb, I've come down to 3 choices. Again, these are not the top of the line cameras but they are going to be very good, and will meet my wants to a great extent.

My choices are the D7100 DX format, the D610 or D800 FX formats.

I've read a lot about how going to a "full frame" or 35mm equivalent generally yields better pictures. The FX format is Nikon's "full frame" DSLR format. The reviews I've read have steered me towards the newer and cheaper D610 over the D800. They tie on snapsort but that doesn't mean they're features are the same. I really like the CF card in the D810 for longer burst mode before the buffer fills, or at least that it minimizes the full buffer issues (the camera locks up until the buffer is written to the disk).

For me, then, the choice is between the D610 and D7100. Here I waffle. Snapsort gives an edge to the D610 in areas I care about, picture quality, color depth, dynamic range, larger view finder. That comes at an expense, though. The D7100 would use my current lenses. The D610 can use my current lenses but at reduced capacity. To buy FX format lenses means another significant amount of money.

I don't want another half step, though, so I'm really leaning towards the D610. Picture quality is what I'm after and the D610 rates higher. It's got higher contrast and color bit depth which should automatically provide better quality. But you don't see the difference unless you have lenses that support that level of quality. The D610 will also probably exceed the capability of my PC monitor to show differences. By the time I can actually get it, though, Nikon may have another version out! If they add more pixels to a D620 that would be great!

It's still a ways off in the future but if I get another Nikon, I think it'll be the D610. That should hold me until I start shooting for Arizona Highways or National Geographic (and they haven't called me yet!).
 

What I don't care about right now

Regarding the snapsort comparo between the D610 and D7100, I thought I'd mention the things I don't care about and why.


  • Lower noise at high ISO (advantage D610) - I have kind of gravitated towards shooting at ISO 100 as much as possible and just don't like the results I get at ISO above about 400 so I don't really care about this.
  • Higher resolution screen (advantage D7100) - I don't use the screen for much, especially for Live View. Histograms will likely look the same on either screen.
  • More focus points (advantage D7100) - I mainly do manual focus so this is a minor interest to me but for wildlife it is a consideration.
  • Shoots faster (advantage D7100) - this is one FPS difference; both are faster than what I have now. I'd still bet (and my reading has confirmed this to some extent) that the limiting factor is the buffer and relatively slow SD card.
  • Smaller, Thinner, Lighter (advantage D7100) - I just don't care. I think it's because I've worn 20 pound guitars around my neck for hours that I don't care about a 2 pound camera.
  • Faster shutter speed (advantage D7100) - I have yet to use the fastest shutter speed on my D3200.
  • Battery Life (advantage D7100) - both are better than the D3200. Both cameras use the bigger EN-EL15 batter (compared to the D3200).