Tuesday, January 26, 2016

DJI Phantom 3 Advanced - Initial Impressions - Part 4

I had been dealing with a sinus infection that won't go away but I had a work holiday on January 18, 2016 to honor Martin Luther King, Jr. I didn't feel great but forced myself to take the drone out to try to take some photographs and try out some of its more advanced functionality. I had charged the batteries up after flying in the back yard the day before, and I charged my phone up as well.

I travelled to the Gillespie Dam Bridge area where I knew there was some rarely visited space that was fairly free of obstacles. The Gillespie Dam Bridge is a bit west of Phoenix. Heading west on Interstate 10 out of Phoenix, you take the State Route 85, exit of of it on the Patterson Road exit just south of the state prison. Continue to you reach Old U.S. Highway 80 and turn right heading north. You'll come to the bridge and you can't miss the rusty old steel bridge - there aren't many like it in Arizona!

The spot I went to is on the west end of the bridge. There's rarely anyone there and its pretty open. I thought I might be able to fly along the side of the bridge and also fly around the open area.

Per somebodies suggestion I had taken a piece of particle board to use as a take off and landing pad. If nothing else it would give me a place without rocks to land.

I parked and got everything set up. I had the DJI Phantom 3 in its box and the second box for my other battery. You have to have the propellers off when the unit is in the box. I assembled the drone, hooked my phone to the controller, placed the Phantom on my landing pad, turned on the DJI Go application on the iPhone, turned on the controller, and turned on the Phantom. I was excited and ready for my first real flight!

Here's video of my first excursion. This is a reduced size video - not the full HD size.


As you can see, I didn't have the White Balance set properly. I had it set to Incandescent from the little clips I did in my house and didn't change it when I got outdoors. I had set the DJI Go app to only allow the drone to go out 200 meters which is where I got to alongside the bridge when I stop and turn it around.

I'll admit that I was a bit nervous seeing the Phantom out that far. That's a big part of the $1,000 toy way off in the distance and the YouTube videos of "fly aways" had gotten to me! My old eyeballs could still make out where the drone was but not its orientation. When you push the "pitch" stick (right control) forward to make the drone move forward, it moves forward in the direction of the front of the drone. You can change which direction the front of the drone is facing with the "yaw" stick (left control). The problem is that after a few yaw adjustments it is difficult to tell from a distance which is the front of the aircraft.

And that is a great reason for the "Return to Home" button. The drone figures out on its own which direction to turn and then drives itself right back to you! I tried that out a number of times and frankly it would be hard to get along without it I think. Once you see the drone heading back to you it allows you to take control again if you want and then you can continue to pilot it to where you want it to go next.

I spent time just getting used to the flight controls. I also tried out the "follow me" functionality by having the drone chase me while I walked around. I started trying out the "waypoint" feature but ran out of battery life before I got that done.

Gillespie Dam Bridge from abut 36 feet elevation
Taken with the DJI Phantom 3 Advanced

On a photographic note, I did take a couple of photographs of the bridge and the dam. I saved them in the DNG RAW format. The histogram looked pretty good. The sky was partly cloudy or partly sunny - not a cloudless sky but also not completely overcast. I thought the daylight was pretty good. I had the ISO set at 100.

Gillespie Dam
Taken with the DJI Phantom 3 Advanced


When I got home to process the images I was underwhelmed. There was quite a bit of noise in the hills on the right side of the image. I processed them in Adobe Lightroom and it did pretty good but the original just wasn't the same as my Nikon D610. The drone MIGHT be about the same as the Nikon D3200 - which I also don't like any more and rarely shoot with it because of the noise.

I am holding my final judgement on the picture quality of the DJI Phantom 3 Advanced because I've seen decent photographs online taken with it. I want to shoot some more with it and hopefully I'll figure out how to get better images with respect to digital noise. But if they don't clear up I'll be wishing I'd got that Nikon 200-500mm f/5.6 lens instead! I'm already questioning my decision. I didn't want to get involved with video and I don't think I'll become a big quad copter fan, at least not of this big bulky type of  'copter. The FPV Racing Quads might be a different story!


Saturday, January 23, 2016

DJI Phantom 3 Advanced - Initial Impressions - Part 3

After ordering the DJI Phantom 3 Advanced, and while waiting for it to arrive, I downloaded and read the manual, watched the DJI tutorial videos, and watched a lot of YouTube videos about or taken by drones, especially the DJI Phantom 3.

I felt I had some insight as to how to approach learning how to fly and control the drone. A co-worker of mine, Nick, who has flown RC drones for years gave me some advice. When it arrived and I got the batteries charged and the firmware updated, I was ready.

I went out to my back yard, set up a crate as my heliport, followed the instructions to turn the equipment on, and hit the "Auto Takeoff" button. The drone armed its motors and then launched, hovering about 4 feet above the top of the TV tray! I was airborne!


Birdseye View
Per Nick's advice, I started slowly moving the roll and pitch controls to just go back and forth in one direction, then flying small squares, in both directions. Getting a feel for the response of the aircraft to the controls. Because the DJI Phantom 3 is such an advanced aircraft, I didn't need to control the elevation manually during these exercises. It will hold it's elevation for you. When you move horizontally, however, you do lose some lift so I did bump up the elevation a bit now and then just to keep it about eye level.

Eventually I had it in an open area with no trees above it and I decided to try making it go higher. I went straight up to about 60 feet. It was still easy to see the drone but at the same time a bit nerve-wracking having something that expensive up in the air that high! I made the camera point down and snapped a picture of my dog Elmer and I in our backyard with the dormant grass.

I was able to land before using up all of the battery, and repeated the trials with the second battery. The batteries were used up before you know it, and way before you want them to be used. It would be great to have half a dozen batteries or so, with the capacity to charge multiple batteries at the same time.

I found that using the DJI GO controller application on my iPhone 5 was satisfactory. I could make out what the camera was seeing. I could access most controls okay. Some of the controls use icons that are rendered very small on the iPhone 5 but I have somewhat grown accustomed to that from other iPhone apps and was able to get around it.

I tried my wife's iPhone 6 Plus which has the larger screen and it wasn't significantly better, not to the point where it made me want to upgrade my phone. I was actually thankful about that - it meant I didn't have to spend more money!

As I mentioned in an earlier post, this is my first encounter with the RC world. I don't know what it would have been like without the auto-hover or video streaming capabilities of the DJI Phantom 3. I do know that those features and others are what people praised in the many reviews I read and what led to their recommendations for this platform and to my purchasing it. I have to say I did not have any trouble flying the drone!

What about some video?


After the batteries had charged again I was able to go through both of them once more in my backyard. This time I captured a video of the adventure. It's not terribly amazing but I edited it a bit by putting some titles on it and one of my songs (the Phantom 3 does NOT capture sound). Enjoy!


Thursday, January 21, 2016

DJI Phantom 3 Advanced - Initial Impressions - Part 2

This unit basically requires some sort of intelligent device that you put on the controller such as an iPhone, iPad, or some of the Android devices. They don't mention any way to use it on a Windows device. The device you use can mount on the controller itself and provides access to most of the drone functionality that is not directly related to controlling flight. For example, you can set up the camera, set the maximum distance you want the drone to fly (useful when learning how to fly), and you can see the image from the drone camera itself.

I really hoped I could use my Kindle Fire but there is no native application for it. Apparently you can "sideload" the application which means opening up the Kindle to a non-Amazon application but I didn't read of anyone having great success so at this point I haven't tried it. Instead I decided to just use my iPhone 5 and then I'd determine if I wanted more.

Before the drone arrived I installed the DJI Go Application through the Apple store. Installation was no big deal, similar to most Apple installations.

DJI Phantom 3 Intelligent Flight Battery
When the DJI Phantom 3 Advanced arrived from DJI the first thing that I had to do was charge the batteries. I'd purchased an extra battery so that meant charging the 2 batteries for the drone plus the battery in the remote controller. I can't say exactly how long it took but I'm guessing it was around 3 hours or more before the batteries were charged. It could have been 4 hours. The controller took the longest, perhaps as long as the two batteries combined.

While the batteries were charging I spent my time reading the brief documentation, registering with the FAA, and watching plenty of videos on YouTube. DJI has some introductory tutorial videos just for the Phantom 3 Advanced and Professional model.

The batteries that power the drone are called "Intelligent Flight Batteries". They have some circuitry in them to support and display the status of the battery's cells. For $150 each they better have something in there!

Note that I am talking about things that are new to me. I have some appreciation as to the technology in this drone compared to earlier versions or drones from other companies. The fact that this drone offers 720K video streaming from the drone to the controller, for example, was a $1,400 or so add on to the version 2! Now they're throwing it in for free! That's just one example of what I'm able to take for granted. Another is the way this drone detects and manages its position through GPS and Glonass, resulting in a hover that pretty much stays where you put it when you take your hands off of the controls. Thanks to everyone who came before, developing this technology!

Once I got the batteries charged and turned things on and linked up I was told I had to upgrade the firmware. This is a process that a number of people complain about. I upgraded the aircraft by downloading the update software and installing it on the SD card. I couldn't get the controller to upgrade that way but when your iPhone is attached you can upgrade online if you have internet access through your iPhone.

Still image from DJI Phantom 3 Advanced
Saved as DNG and processed in Lightroom
Finally, I was ready to fly but it was about 2:00 AM and dark outside. Instead I took some photographs and video with the device and familiarized myself with the controls. I couldn't hold back, and installed the propellers and actually lifted off inside the house. It was only a few seconds before my wife came out and, with a pleasant voice, reminded me of the current time and that she had to get up early to take a vehicle in for service. I shut the unit down to wait until the following day...

I transferred the few images to my PC and did a little playing around in Adobe Lightroom with the DNG images. Then I decided to go to bed so I could get up at some point when the sun came up and take the drone outdoors.

Why the "Advanced" model?

DJI makes three variations of the Phantom 3, the "Standard", the "Advanced", and the "Professional". The Standard lacks a number of features that I thought I should get and most of the reviews I read echoed my thoughts. You can review the differences on DJI's website. The Standard has an inferior video downlink, does NOT use the GLONASS satellite system, does NOT have the Vision Positioning System which helps with flight control when satellites are not available (e.g. when you're indoors), does NOT support filters for the camera lens, and has a less capable controller, to name a few items. I was especially interested in the ability to have lens filters. I decided the Standard was not enough for me.

The Advanced and Professional models are identical except for 3 items:
  1. The Professional has a camera that will capture 4K video; the Advanced will only capture HD video.
  2. The Professional comes with a higher powered 100W charger; the Advanced comes with only a 57W charger meaning that the battery charging time is longer.
  3. The Professional has Gold stickers; the Advanced has Silver stickers. Note that the Standard model has Red stickers.
Since I'm not after the camera for video purposes and the still image specifications are the same between the Advanced and the Professional, and the Professional was selling for about $350 more, I decided to go with the Advanced model and use the savings for additional batteries (I will buy at least one or two more I'm betting...) and other accessories. This is the same conclusion I found a lot - unless you're trying to get the best video available, and as long as you have a computer where you can process and/or view that video, the HD format video is still really good.


Wednesday, January 20, 2016

DJI Phantom 3 Advanced - Initial Impressions - Part 1

I believe I've posted that I've been interested in the new(ish) Nikkor 200-500mm f/5.6E lens. At the beginning of the new year I almost got it but then another idea started competing - to get a drone that would take decent still photographs. I've had this idea for a while, at least since reading about it in Outdoor Photography magazine.

I did a bit of research and the name that kept coming up in the price range I was interested in was the DJI Phantom 3 Advanced. It has a camera on a 3-axis gimbal that shoots amazing HD video and I found a number of decent stills taken with the unit too.


DJI HD Camera on Phantom 3 Advanced
The camera is made by (or at least branded) DJI using a Sony EXMOR 1/2.3" sensor that will shoot 4000 x 3000 pixel images in JPEG and, more importantly to me, DNG! If you don't know, DNG is an Adobe open, lossless RAW image format, supported of course by Adobe Photoshop (PS) and Lightroom (LR). So you get a 12 MP image in a RAW format that can be shot from a very stable platform at up to a (legal) height of 400 feet!

I thought this would open up some new perspectives for images! I also hope to be able to stitch together shots in PS or LR to get larger shots if desired.

I've also mentioned in the past how I have a hard time imparting the sense of height from the top of a ridge or cliff and I have wondered if having some additional height for the camera might make a difference. Alternatively, shooting from off of the cliff might do it too. A drone would allow those types of shots, and many more! Like shooting a saguaro from more than 6 feet off the ground! The rocks at Chiricahua National Monument!

On the other hand, the Nikkor lens has received nothing but wonderful reviews, even from Ken Rockwell, and that's not very often that he likes something! It's reported as having better image quality (IQ) than the competitive 150-600mm lenses from Tamron and Sigma, as well as better build quality than either of those lenses. However, the Nikkor has 50mm less reach on the short end and 100mm less on the long end. The smaller magnification factor allows for tighter tolerances and better performance from the Nikkor - it's just a matter of which is more important, focal range or IQ.

Not long after I got into photography I determined that IQ was my main motivation and trying to achieve sharpness and clarity and color saturation were what I was interested in and still am. Consequently, along with my attraction to genuine Nikon gear, I really wanted this lens.

Around the beginning of 2016, both of these items were hard to find at times, an indication of how popular they are. At the same time, DJI celebrated their 10th anniversary and offered a 20% savings on the Phantom 3. I decided to take the plunge and go for this instead of the lens. They are both in the same ball park as far as cost (the lens was about $1,400; the Phantom 3 Advanced was $799 but with an extra battery at $150 and a case at another $150 you're up at $1,100).

I ordered mine directly from DJI (Adorama and B&H Photo also carry them, with no tax to Arizona residents and free shipping, but they were out of stock). DJI had the same deal (no tax, free shipping). It took about 3 days to arrive and all of a sudden I was a drone owner!

I'll continue my thoughts on my drone and my decision in my next blog or two...

DJI Phantom 3 Advanced w/ Apple iPhone 5

Tuesday, January 5, 2016

A Bit of Satisfaction and Pride

I got a bit of a return on my photography, one that is pretty meaningful to me! And I'm going to brag about it. One of the biggest paybacks I get from taking photographs is sharing them with others and getting their feedback. I have mostly had good feedback and I really enjoy hearing someone say "that's gorgeous" or "I want one of those to hang in my house". I like seeing the smiles. I like being asked "where is that?" or "how did you do that" (I don't have a lot of these.) I like it when someone says "you could sell those" or "that would be a good postcard".

I have had a good number of those reactions I'm happy to admit, in person as well as from online postings such as Facebook. They always make me feel like I'm figuring out how to take a good photograph. Over the holidays I've had two different instances that bolster my ego regarding photography...
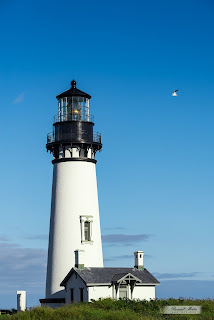
Yaquina Bay Lighthouse

I attended a Christmas party for one of the units at work that I do software engineering for. The party included a "white elephant" gift exchange with a limit of $20. I immediately decided to give a framed photograph. I was able to use a discount at Walgreens to get an 11x14 print for about $5.00 and I found a decent, matted frame at Walmart for about $17.00. I cheated a bit but too bad.

I was torn between giving a photograph from Arizona, which would perhaps be more practical for more homes in the Phoenix area, perhaps more likely to fit in with an existing decor and therefore more likely to be hung up. On the other hand, I thought of one of my favorite lighthouse photographs from my Oregon trip in August 2015. I decided to go with the Yaquina Bay lighthouse with a flying seagull in it.

The photograph was a hit, and ended up being "stolen" by the final recipient. She had visited Oregon and just loved it. Almost everyone else said how beautiful it was too. That was very rewarding! My photograph was going to be hung on someone's wall who wasn't a relative!

I had also decided to get myself one of my prints for Christmas (okay, my wife gets to look at it too), in particular I wanted to try a metal print. I chose to print a large panorama from the north rim of the Grand Canyon that I titled "Angels Vista". It is a 4 exposure panorama processed in Adobe Lightroom, of the view near Angels Window.


Angels Vista

I uploaded the image to my account on Pixels.com (http://Randall-Morter.Pixels.com) and chose to print it at 48" x 20". Pixels is cool in that they actually print images at the source image ratios and don't force you to crop them to a standard print size.

I had been interested in a metal print for some time. I wanted to see if the vibrance is truly different. I wanted to see what it looked like hanging on the wall. I wanted a good size print.

The print arrived in about 2 weeks after ordering it. It was packaged well. Unfortunately there was an issue on the right side of the print - similar to a double exposure. It only affected about the right 1/4 of the print so I guessed that the metal slipped when going through the printer. I contacted Pixels.com ON A SUNDAY - their help desk is open 24x7. They created an issue ticket for me and I received a follow up email within 2 days.

I took some pictures of the issue and sent them to the help desk and was issued a replacement that arrived in about a week. It was perfect!

That left me with the somewhat flawed original print. I have to interject that my wife had not noticed the image "ghosts". I decided to see if I could donate it to my employer, the Arizona Department of Education. The director of Human Resources said it was beautiful and they'd look into hanging it somewhere. It was accepted and now hangs in the waiting room for the Teacher Certification unit on the main floor where thousands of teachers pass through each year.

What about the metal print?


I didn't notice or think that the print was truly more vibrant, but without a comparable paper print I can't really say that it was or wasn't better. I almost would like to try it again with the saturation / vibrance really boosted a lot more. On the other hand, it is of an overcast day so it may not be worthy of that sort of treatment.

Overall, however, even though the replacement version is fine, the metal prints look unfinished to me. I think I prefer a print with a matte and a frame. It might be possible to put some sort of frame around the metal print, similar to what I've had on a canvas print, like a 1" wide black wood frame that kind of "floats" around the metal print with a 1" gap or so. That might be better. Someone else suggested just adding other items around the metal print, for example, some metal cactus wall art. Other photographs might suffice too. Those suggestions might work but if it was a matted and framed print I think it would stand on its own.

On the other hand, my cost for the 4 foot wide print, finished and suitable for hanging, was about $180. A paper print in a matted frame would have been much more expensive if the frame was nice at all. The frame I got my son for a 30" x 20" photograph was about $250. So there is the trade off.

Because of the large image size, Pixels would even print the photograph larger, up to 5 feet wide. I didn't end up going to that extreme but in the end I wish I had. I would like to see it at that size! I may eventually do a paper print of it at that size.